
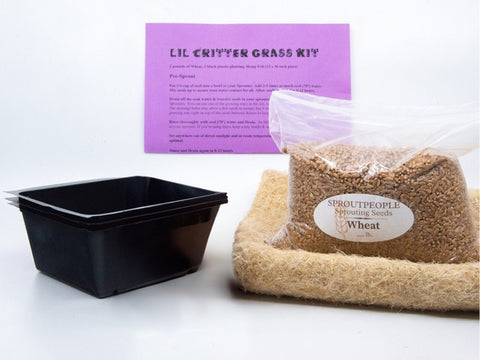
Lil Critter Grass Kit
2 pounds of Wheat Grass Seed, 12 x 36 inches of Hemp Felt planting medium, 3 black plastic trays with drainage, and Printed Instructions.
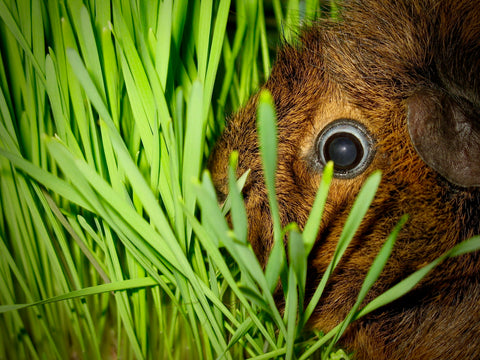
Keep your Turtles, Guinea Pigs, Gerbils, Hamsters, etc. supplied with fresh, nutritious, delicious, tender Grass for months. We added this kit in honor of Lori's brother Dan, whose Guinea Pigs - Susie and Sara so loved Wheat Grass.
For Sprouting Instructions, click here: Wheat Grass, or view/print the instructions that come with this kit.
The Seeds
2 pounds of Wheat Grass
Our has won thousands upon thousands of kitty customers and their loyal human growers, over our years as Sproutpeople. Though any creature can enjoy Kat Grass, Wheat Grass is the favorite of Lori's brother Dan and his Guinea Pigs, so that's what we include in this kit. Fresh grass is easily digestible thanks to its fresh tenderness. It provides creatures with essential nutrients & fiber.
Everything Else
For Planting/Growing 3 black plastic containers with drainage We include extra containers to cover those that wear out - though we often get well over a dozen uses from each.
Hemp Felt Soilless Planting Medium One 12 x 36 inch piece - enough to cut 27 pads of 4x4 inches
Salad for Your Lil Critter
Animals need fiber in their diets just like people do. Save your house plants while providing much better nutrition - by growing your own grass. We sold over 250,000 containers of Kat Grass between 1993 and 2003 (when we were professional growers), and we've sold tons of Kat Grass seed to home growers. Now we have a kit specifically for your smaller friends.
Keep your critters supplied with fresh, nutritious, delicious, tender, non-puking Kat Grass for months with a single Lil Critter kit.
The Seed in this Kit are supplied to us by farmers who are Certified Organic!
For Sprouting Instructions and to learn more about the seed, click here: Wheat Grass.
The Seeds
2 pounds of Wheat Grass
Our has won thousands upon thousands of kitty customers and their loyal human growers, over our years as Sproutpeople. Though any creature can enjoy Kat Grass, Wheat Grass is the favorite of Lori's brother Dan and his Guinea Pigs, so that's what we include in this kit. Fresh grass is easily digestible thanks to its fresh tenderness. It provides creatures with essential nutrients & fiber.
Everything Else
For Planting/Growing 3 black plastic containers with drainage We include extra containers to cover those that wear out - though we often get well over a dozen uses from each.
Hemp Felt Soilless Planting Medium One 12 x 36 inch piece - enough to cut 27 pads of 4x4 inches
Though this Kit does come with printed sprouting instructions, you will always find the most information by visiting the seed's detailed page: On our Wheat Grass page you will find everything you will ever want to know about the seed, and how to sprout it.
It is necessary to sprout the seed before planting. You can manage without, but we suggest that you also purchase a Sprouter. There are many choices, but here is our favorite:
Easy Sprout Our most popular Sprouter, it is also our personal favorite. Great drainage and the best air-circulation of any Sprouter. It won't grow Grass but it's a great choice for pre-sprouting!
My guinea pigs inspired me to try sprouting, since I buy so many fresh veggies for them, I thought about growing my own.
They fight over the wheatgrass, pry it from the growing container and even eat the tender roots. I enjoy growing my own wheatgrass and the piggies love it!
My guinea pigs inspired me to try sprouting, since I buy so many fresh veggies for them, I thought about growing my own.
They fight over the wheatgrass, pry it from the growing container and even eat the tender roots. I enjoy growing my own wheatgrass and the piggies love it!
The small trays are great for growing grass for small pets. Here's a way to use wheatgrass that I'm sure few have thought of. If this kit still comes with clear containers it's wonderful for showing young children how roots (and plants) grow. Unlike soil, you can pick up baby blanket to show the growing roots, or just pick up the clear containers and look underneath them.
Wheatgrass grows fast and my preschool students were amazed to come to school and see how much bigger the grass had grown. When the pre-cut blanket and seeds are eventually gone I'll buy B.B. in bulk and order another pound of W.G. seed.
