
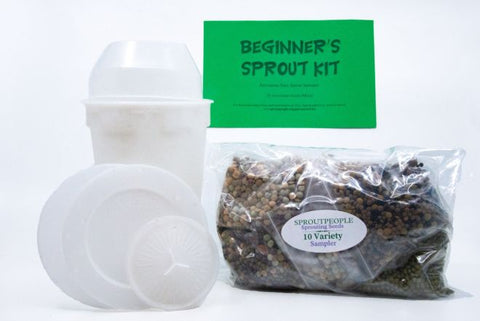
Beginner's Sprout Kit
An Easy Sprout Sprouter and our 10 Variety Sprouting Seed Sampler
The ideal choice for anyone who wants to give sprouting a try or turn a friend on to sprouting. The 10 Variety Sampler is made up of Single Harvest packs which will produce - over time - 5 pounds of the greatest sprouts you've ever had, while the Easy Sprout Sprouter will allow you to easily sprout the seeds in the Sampler as well as just about any seed you are ever likely to sprout in the future.
For Sprouting Instructions, click the name of the Seed or Mix you want to grow. And learn about the Easy Sprout Sprouter
The Seeds
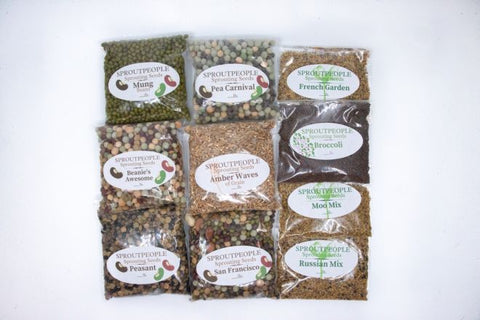
Amber Waves of Grain
Wheat, Spelt, Kamut, Triticale, Rye, Oats, Barley, Quinoa, Millet, Sesame, Amaranth
Just about every grain and pseudograin under the sun, combined into a sweet and nutritious treat.
Beanie's Awesome Mix
Green, Crimson & Red Chief Lentils, Green, Marrowfat & Yellow Peas, Beige Garbanzos and Adzukis
An amazingly beautiful - pastel bean mix. Our original bean combo was originally called Jupiter's Awesome Mix - after our (first) beloved dog, who is responsible for our move "back to the land".
Broccoli
Great tasting, easy to sprout. Broccoli Sprouts can contain 50 times the antioxidant level of the vegetable version of Broccoli.
French Garden
Clover, Arugula, Cress, Radish, Fenugreek, and Dill
Our most popular Leafy Sprout blend. Period.
Moo Mix
Alfalfa + Clover
A mild Leafy Mix of America's favorite sprouts.
Mung Beans
The most consumed sprout on earth. A staple of Asian cookery and a very fun sprout to grow.
Pea Carnival
Green, Speckled, Marrowfat, Tiny Mottled Bill Jump & Yellow Peas
5 Pretty Peas combined into a lovely, though too oft overlooked, easy to sprout treat.
Peasant Mix
Green, French Blue, Crimson, Black, Eston, Pardina, White, and Red Chief or Red Cap Lentils
Simple yet elegant, this is Gil's favorite Bean Mix to eat.
Russian Mix
Clover, Fenugreek, Mustard, Onion and Dill
Our Original, and still personal favorite Leafy blend.
San Francisco Mix
Peanuts, Mung Bean, Adzuki Bean. Black, Crimson, Eston, French Blue & Green Lentils. Green, Speckled & Bill Jump Peas. Black, Brown & Beige Garbanzos
Our most popular Bean Mix is beautiful, dark and contains a wide range of tastes and symbiotic textures.
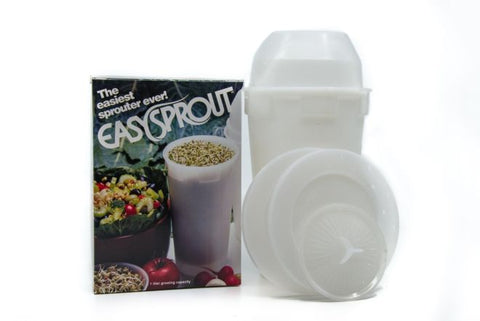
The Sprouter
One Easy Sprout Sprouter
Overwhelmingly our most popular sprouter, Easy Sprout is also our personal favorite. We have well over a dozen in our house. It offers great drainage and the best air-circulation of any sprouter.
Easy Sprout is made up of a 1 Quart (litre) Growing Vessel, a Solid container/Base that catches excess Rinse water, a Small Seed Insert that snaps in when sprouting small seeds, two Growing Lids (1 for home (Domed) and 1 for the road (Flat)), and a Solid Lid for refrigerator storage of your sprout crop.
Easy Sprout is the best all-around sprouter. Period. It is the mandatory choice for high humidity sproutpeople everywhere and great for travel sprouting! Very versatile - Easy Sprout can sprout virtually any seed, anywhere!
Easy Sprout is part of many of our Kits.
A great Introduction to Our Huge Variety of Sprouting Seeds Try a wide variety of tastes and textures while learning how to sprout.. An Easy Sprout Sprouter and 10 easy to grow seeds and mixes along with easy to follow and thorough growing instructions (here on our web site) will turn just about anyone into a sprout lover.
This Kit does not come with printed sprouting instructions. You will want to come back to this page - or navigate else-ways through our site - to get to each seed's detailed page. On those pages you will find everything you will ever want to know about each seed/mix, and how to sprout.
I'm very grateful to Sproutpeople for this beginners kit. I bought a bunch of other things too. I've been eating their sprouts since the early 90s, and they always made me feel good. Even happy! These are great people, and great products. <3
Us Sproutpeople moved our site to a new e-commerce system in December 2024. Sadly the reviews for this kit were one of the few things that didn't migrate over. If you want to see what others have said you can still visit our old site. Here's a link to our Beginner's Sprout Kit: https://sprm2-vm104.dev.vonnda.net/get-started-kit/
=:-)
Eating our first batch - we LOVE them!! I started with Peasant Mix and it’s delicious.
I just returned to sprouting after a 20 year lapse. Why? 🤷♀️
The sprouter works wonderfully- so easy, and I appreciate the online instructions too. They’re a great refresher.
Just enjoyed my first batch of broccoli! The detailed instruction, video, and day by day photos gave me the resources I needed and confidence that I was on track. It's reassuring when your own sprouter looks like the photo. :) The instructions and video may be considered too lengthy and detailed for some, but I personally appreciated it very much!
Trying to decide which package in the beginner's kit to try next. I love that the kit contains a variety of beans, grains and sprouts. It gives me a chance to experiment with things I may not have otherwise ordered due to my lack of knowledge.
Thank you!
I got this for myself a while ago and found this to be a great way to dip my toe in and try out different types of sprouts available. I ordered another kit as a housewarming gift for a friend. This turned out to be a fun and different gift option!
