
Master Microgreens Kit
This Kit is for advanced Microgreen farmers. It is made up of a small Stainless Steel Tray Sprouter and 6 different seeds/mixes that will grow 24 crops (4 crops of each):
- Arugula
- Broccoli
- Bruno's Indoor Garden
- Cilantro
- Pea Shoots
- Spicy Salad Greens
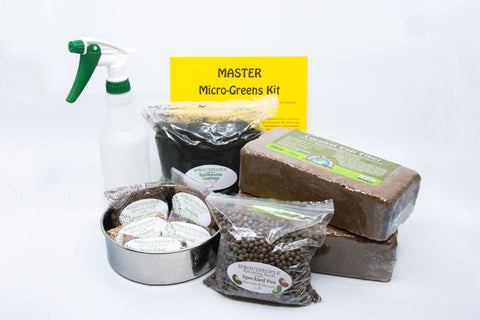
2 bricks of Coconut Coir, 2 pounds of Earthworm Castings, and a Spray Bottle - and printed instructions. With this kit an Indoor Farmer will experience the joy of growing Microgreens on a deep and fertile medium. The range of seeds will be a great education and they are all not only super nutritious - but also stunningly beautiful and delicious.
Master Microgreens Kit
Our small Stainless Steel Sprouter, 2 Bricks of Coconut Coir, 2 lbs. of Earthworm Castings, a Sprayer, and great organic sproutpeople seeds
There is just nothing like growing your own food! We made this Kit so you can experience the joy of growing Microgreens on a deep and fertile medium.- and not just any Micros – but some of the best. The seeds weigh different amounts – but all together you now have seeds enough to grow 12 – 24 crops (depending on how densely you plant). If you’re new to Indoor Farming – start with the lesser amount suggested. If you do – you’ll get 24 crops. Four of each. We suggest you hold the Cilantro and Bruno’s Indoor Garden back until you’ve enjoyed some success. They are not difficult – but they are a bit more challenging. Start with Spicy Salad Greens or Broccoli – then try Arugula or Pea Shoots. You could start with Pea Shoots too. It’s really up to you. Our website has detailed growing instructions for every crop and we have some videos that will guide you as well. Our pages are extremelythorough. We use Tabs (on computer)/Pull-Down Menus (on mobile devices) to organize the content. Clicking on a Tab reveals its content. If you’re new to a crop be sure to focus on the Tab labeled Detailed Instructions, though please do check out the others as they are all valuable. You can get to the detailed page for any crop by clicking its name on our Seeds page. But here are the basics and some general knowledge to get you growing...
MAKING UP YOUR GROWING MEDIUM and PREPARING TO PLANT. (video: Working With Coconut Coir)
Coconut Coir comes as a compressed brick. Put a brick into a container at least 2 gallons in size. Add water – warm is good – and watch it – or play with it – for about 15 minutes. Add more water if necessary until you end up with a lovely loamy material. If you get too much water in it you can squeeze it out. We have a video that might help - though it is as easy as it sounds. The video is called Working With Coconut Coir. It appears on our Coconut Coir page @:-)
Some of the crops will benefit more than others if you mix Earthworm Castings into your Coir. You have enough for several crops. You can mix it in now – or save it for the crops that really need it and mix it up at planting time. In either case – the goal is to have a medium of 75% Coconut Coir and 25% Earthworm Castings for the more needy crops – which are Bruno’s and Cilantro.
Store your Coir/Medium in the big plastic bag we sent and keep in a cool dry place. It will last for many months (at least).
Fill the small Stainless Steel Sprouter about two-thirds full of medium.
Thoroughly moisten the medium.
The goal is for the medium to be completely saturated, but for the water to flow freely through. If puddles start to form then stop and let the water absorb/drain.
What you Reallyshould do now is go to the page for the crop you want to grow.
You can click the name of the crop from this page.
BROCCOLI, BRUNO'S INDOOR GARDEN, SPICY SALAD GREENS (video: Growing Microgreens - Bruno's Indoor Garden)
- Spread ½ - 1 Tablespoon of seed across the thoroughly moistened medium.
If you’re new to Indoor Farming – start with the smaller amount.
Spray the seeds to help moisten them and seat them in the medium.
Cover the sSSSprouter with an inverted plate.
- Spray the Seeds twice a day until they bury their roots in the medium to keep them moist (about 4-5 days)
- Uncover your crop when they reach the inverted plate covering them. Move them to as bright a spot as you have. They would love direct sunlight – but they’ll do remarkably well with kitchen light too.
- Keep the medium moist by adding water to the lower plate (or whatever) and allowing the medium to soak up its fill. Empty the water after 30 minutes. Please note that for these 3 crops you may not need to moisten the medium at all, and if you do it will likely be after a week and they won’t need much.
- Harvest your crop when all of the leaves have opened up and are green (some may be red =:-)
- These crops will grow to be 2 or more inches tall. Harvest by cutting close to the medium with a scissors.
- Store your crop in a plastic bag in a refrigerator. Your crop should be fairly dry to the touch before refrigerating.
- Spread ½ - 1 Tablespoon of seed across the thoroughly moistened medium.
If you’re new to Indoor Farming – start with the smaller amount.
Cover the sSSSprouter with an inverted plate.
- Do not mist these seeds, but do check on them occasionally during the first few hours to see what they do. They are mucilaginous.
- Uncover your crop when they reach the inverted plate covering them. Move them to as bright a spot as you have. They would love direct sunlight – but they’ll do remarkably well with kitchen light too.
- Keep the medium moist by adding water to the lower plate (or whatever) and allowing the medium to soak up its fill. Empty the water after 30 minutes. Please note that for Arugula you may not need to moisten the medium at all, and if you do it will likely be after a week and they won’t need much.
- Harvest your crop when all of the leaves have opened up and are green.
- Arugula will grow to be about 2 inches tall. Harvest by cutting close to the medium with a scissors.
- Store your crop in a plastic bag in a refrigerator. Your crop should be fairly dry to the touch before refrigerating.
PEA SHOOTS (video: Growing Pea Shoots)
- Measure 1/3 – ½ cup of Peasinto a bowl. Pour in at least twice as much cool water and stir, to assure all seeds get even water contact. Allow to Soak for 8-12 hours.
- Pour your soaked Peas into the small Stainless Steel Sprouter. Rinse thoroughly. 10 - 15 seconds is plenty. Drainthe water out by tipping the Sprouter and tapping the bottom (screen) to help the water escape. Place the sSSSprouter on a plate big enough for it to sit flat. Cover with a second plate, bottom side down. Locate this anywhere out of direct sunlight.
- Rinse and Drain your Peas 12 hours . If their roots are beginning to emerge it is time to plant.
- If they have not begun togerminate –Rinse and Drain again.
- When the seeds begin to germinate – move them and wash your sSSSprouter – then prep your Growing Medium – then spread the Peas across the surface of the thoroughly moistened medium. Press them slightly into the medium if you like – just a tiny bit. Peas will do fine on straight Coir, but they certainly won’t mind if you use Worm Castings. Cover your crop with an inverted plate and set anywhere out of direct sunlight.
- Spray the Peas twice a day until they bury their roots in the medium to keep them moist.
- Uncover your crop when they reach the inverted plate covering them.Move them to as bright a spot as you have. They would love direct sunlight – but they’ll do remarkably well with kitchen light too.
- Keep the medium moist by adding water to the lower plate (or whatever) and allowing the medium to soak up its fill. Empty the water after 30 minutes.
- Harvest your crop when it reaches the size you desire. Taste them by pinching a shoot off every day. That’ll inform your future crops. They are most tender when young, but most people grow them to 6 or more inches.
- Store your crop in a plastic bag in a refrigerator. Your crop should be fairly dry to the touch before refrigerating.
CILANTRO. (video: Growing Cilantro Microgreens)
- Spread ½ - 1 Tablespoon of seed across the thoroughly moistened medium.
If you’re new to Indoor Farming – start with the smaller amount.
Cover the sSSSprouterwith an inverted plate.
- Uncover your crop when they reach the inverted plate covering them. Move them to as bright a spot as you have. They would love direct sunlight – but they’ll do remarkably well with kitchen light too.
- Keep the medium moist by adding water to the lower plate (or whatever) and allowing the medium to soak up its fill. Empty the water after 30 minutes. Please note that for Cilantro you will need to water every couple days if you’re growing past the Cotyledon (first leaves) stage – starting after 7-10 days.
- Harvest your crop when all of the leaves have opened up and are green. Growing Cilantro long enough results in a bigger crop with True Leaves (see the Glossary on our Help page).
- Cilantro will grow to be about 2-3 inches tall. Harvest by cutting close to the medium with a scissors.
- Store your crop in a plastic bag in a refrigerator. Your crop should be fairly dry to the touch before refrigerating.
THINGS TO KNOW (There’s space to share =:-)
- Microgreens are generally harvested when their first leaves (Cotyledons) open up and turn green (or whatever). Some crops are capable of growing their next set of leaves – which are called True Leaves. They are the leaves you’re familiar with from buying a bunch at the market – but smaller because these are Micro Greens. It can take 3-4 weeks to complete a crop grown to True Leaves. Among the offerings in this kit we would only grow Cilantro to that stage. Arugula would be fine, but it’s not often willing in our experience.
- Most crops will be ready in 7-10 days.
- You will find all of our videos on our YouTube page, but these in particular will assist you with this kit….
Growing Microgreens - Bruno's Indoor Garden
- If your plants begin to wilt they are probably thirsty.
- Microgreens (with the exception of Pea Shoots) do not store well once harvested. They should be eaten as soon after harvest as possible for maximum deliciousity and nutrition.
- Watch the Arugula when you plant it. It is a mucilaginous seed. There are other such seeds in the mixes – but when you plant one straight you get the full impact of what it means. After planting them check back on them periodically to see the formation of gel sacks. These sacks hold all the water the seed needs to germinate. It’s astounding! Anyway – there’s no reason to spray a seed surrounded by water/gel.
Happy Growing!
You will find additional instruction, photos, videos, recipes, and more on
sproutpeople.org
We originally offered this Kit as a Limited Edition holiday Kit, in 2020. It is so perfect that we've decided to bring it back as a permanent addition. Our small Stainless Steel Sprouter is great for growing Micro-Greens. It allows us to use a deep growing medium - which is our favorite way to grow. Our favorite is Coconut Coir mixed with Earthworm Castings - so this limited edition kit includes all this - and great seed...
small Stainless Steel Sprouter
2 Bricks of Coconut Coir
2 Pounds of Earthworm Castings
THE SEEDS
1/3 cup of each - except the Pea Shoots which are a pint (a pound)
Arugula Broccoli Bruno's Indoor Garden Cilantro Pea Shoots Spicy Salad Greens
These Videos will help guide you...
Growing Pea Shoots
Growing Microgreens - Bruno's Indoor Garden
Growing Cilantro Microgreens
Working With Coconut Coir
Our small Stainless Steel Sprouter is great for growing Micro-Greens. It allows us to use a deep growing medium - which is our favorite way to grow. Our favorite is Coconut Coir mixed with Earthworm Castings - so this limited edition kit includes all this - and great seed...
small Stainless Steel Sprouter
2 Bricks of Coconut Coir
2 Pounds of Earthworm Castings
THE SEEDS Arugula Broccoli Bruno's Indoor Garden Cilantro Pea Shoots Spicy Salad Greens