

Easy Sprout Sprouter
Before raving about it - we want to tell anyone who is having problems with their Small Seed (Alfalfa) Insert snapping into place - the fix is simple: Using any pliers - crimp the thin outer lip of the Insert in 2-4 places around the circumference. This will form bulges that will make it snap as it should. We've been doing it for years as we have many at home that we use constantly =:-)
Overwhelmingly our most popular sprouter of all time - Easy Sprout is also a personal favorite of ours and thanks to its small footprint we can have more than a dozen growing sprouts in our not large kitchen. It offers great drainage and the best air-circulation of any sprouter. BPA-free and Kosher!
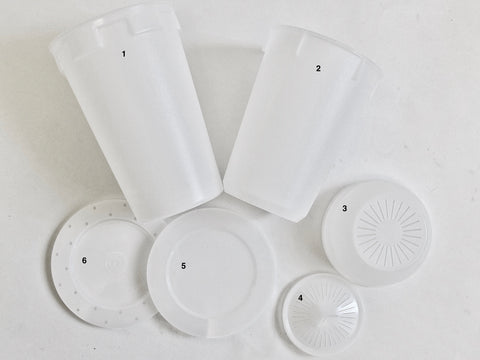
Easy Sprout is made up of a 1 Quart Growing Vessel, a Solid container/Base that catches excess Rinse water, a Small Seed Insert that snaps in when sprouting small seeds, two Growing Lids (1 for home (Domed) and 1 for the road (Flat)), and a Solid Lid for refrigerator storage of your sprout crop.
Easy Sprout is almost a mandatory choice for high humidity sproutpeople everywhere and great for travel sprouting! Very versatile - Easy Sprout can sprout virtually any seed, anywhere!
Easy Sprout is part of many of our Kits.
If you want a Sprouter that can also grow Microgreens and Grass - check out our Stainless Steel Sprouter and small SSSprouter.
Yields approximately 4 Cups (1/2 lb.) of Sprouts
Seed Prep
Measure out 2 Tablespoons of seed* (slightly heaping) into your Sprouter or a strainer.
Rinse your seeds to remove dust and debris.
Soak
Transfer your seeds into your Sprouter (if necessary), or to a bowl.
Mix seeds up as you slowly add water to assure even water contact for all.
Add 2-3 times as much cool (70-80°F) water.
Allow seeds to Soak for 4-12 hours.
Do Not Ever Soak Again. Soaking is done only this one time.
We start counting days at this point - when the Soak is done (post-Soak is the phrase we use).
A crop of Leafy Sprouts usually takes 6 days - from This point in time to harvest.
Sprouting
Empty the seeds into your Sprouter (if necessary).
Drain off the soak water.
You can use it - it has nutrients in it. We use it on house plants.
Rinse thoroughly with cool (70-80°F) water.
Drain thoroughly.
Draining Thoroughly (Maniacally even) is the key to great crops. The smaller the seed (all Leafy Sprouts are small seeds) the more thorough you must be. Do Not skimp on Rinsing - but focus seriously on Draining.
If you need to see what we mean by Thorough Draining - check out our videos.
Set your Sprouter anywhere out of direct sunlight and at room temperature (70° is optimal) between Rinses.
This is where your sprouts do their growing. We use a counter top - in the corner of our kitchen, where the sprouter won't get knocked over by cats, dogs, kids or us. Indirect sunlight is fine, as is your regular room light - because light just does not matter much in the first couple days.
A plant can only perform photosynthesis when it has leaves. Until a plant has leaves, light has little if any effect. Sprouts also happen to like air-circulation, so don't hide your sprouts. When leaves do appear, this will be plenty of light for them to green up. You can also use Grow Lights if you like.
Rinse and Drain again every 8-12 hours for 3 days.
Always be sure to Drain very thoroughly. The most common cause of inferior sprouts is inadequate drainage. Even the best designed Sprouting Device holds water, so pay special attention to this step.
Greening
On the 4th day (post soak) relocate your sprouts, if necessary.
If you've been keeping them away from light - move them. Avoid direct sun as it can cook your sprouts, unless you are growing in a Tray Sprouter - in which case direct sunlight is great. Indirect sunlight is best for non-tray Sprouters but grow lights work well too. Experiment - you will be amazed at how little light sprouts require to green up. Photosynthesis is a marvel!
Continue to Rinse and Drain thoroughly every 8-12 hours.
Your last Rinse and Drain will be either at the end of day 5 or the start of day 6.
Always Drain Thoroughly.
Finishing
Your sprouts will be done about the end of day 6.
The majority of sprouts will have open leaves which will be green. You'll recognize them.
De-Hulling
Hulls are the thin coat on a seed. In most cases they separate themselves from the sprout. They are only a problem when it comes to the shelf life of your finished crop. We've eaten them for years and consider them extra roughage, but the crop looks better and lasts longer without them - so removing them is good.
You may De-Hull your sprouts at any time during day 5 or 6.
If you have a Salad Spinner - De-Hulling can be your last step. You can harvest and refrigerate them immediately after you finish.
You can also remove hulls prior to harvest...
If you are growing in a Jar - using the Coarse Mesh Screen will allow some hulls to float out through the screen while Rinsing. Repeating and agitating your sprouts will allow more hulls to escape.
If you're growing in an Easy Sprout Sprouter - transfer your sprouts to the Solid Base, fill with water, and agitate with a fork. This will help hulls get to the surface - where you can skim them off. When you've gotten all you can - move your sprouts back to the Growing Vessel, Rinse again, and Drain Thoroughly.
If you're growing in our Stainless Steel Sprouter you can get rid of most of the hulls by Rinsing Upside Down. Instead of writing words - let us direct you to our short video on the subject: Rinsing Leafy Sprouts Upside Down
Here is our video on De-Hulling.
Harvest
If you De-hulled with a salad spinner - you can go right to refrigeration. If not... Your sprouts are done 8-12 hours after your final Rinse and Very Thorough Draining. If we minimize the surface moisture of our sprouts they store much better in refrigeration, so we let them sit for 8-12 hours after that final Maniacal Draining.
Storing Your Crop
Transfer your sprout crop to a plastic bag or the sealed container of your choice. We have Produce Storage Bags that can extend shelf life substantially.
Leafy Sprouts are best within a week of harvest, but we've had some crops last for over a month in the fridge.
Great work sprout farmer!
*Amount of Seed to Use
* If using Sproutpeople's Single Harvest Pack - use the whole bag (for a one-quart Sprouter). It will produce a crop of approximately 8 ounces.
These seeds yield approximately 7:1 - which means the sprouts will weigh 7 times as much as the seed you start with, but, they will increase even more in volume - so don't start with more than 2 (heaping) Tablespoons per quart/litre of sprouter capacity.
BPA Free
Our favorite all-purpose sprouting device, the Easy Sprout has: Excellent Drainage, Superior Air-Circulation and is the most forgiving sprouter ever designed. Devoted Sproutpeople everywhere worship it.
What would Jesus sprout (in)? @;~)
We have well over a dozen Easy Sprouts in our home. We have used them, almost exclusively for many years. They're extremely durable, easy to clean, dishwasher safe, will sprout virtually any seed, compensate for hot, humid conditions with a dynamic air-flow design, and are inexpensive.
Easy Sprout is 3 1/4 inches on the bottom and 4 1/2 inches on the top. It is 7 inches tall. It has a 1 liter/quart capacity. It is made of High Density Polyethylene (Fortiflex® T50-3600 HDP) - which is one of the few non-leaching plastics. The Easy Sprout is also Kosher - we kid you not.
It came to the inventor Gene Monson in a dream, in the late 1970's. He has spent his life since, spreading the word of Easy Sprout.
The Parts (see picture above - the one with numbers):
1) Solid Base2) Growing Vessel 3) Dome Lid 4) Small Seed Insert 5) Flat (storage) Lid 6) Flat Vented Travel Lid.
Growing Capacity One Quart. It can produce up to 1 pound of Leafy Sprouts or 2 pounds of Bean or Grain Sprouts.
Excess water drains into the solid base (though you still need to drain thoroughly), so you can leave it anywhere without worrying about making a mess.
With the snap on Vented Flat Lid, you can take your Easy Sprout(s) everywhere you go. Now you can Easy Sprout while travelling!
Eat More Sprouts + Grow More Often - Easily!
For Sprouting Instructions, click the name of the Seed or Mix you want to grow.
Seeds to Sprout In the Easy Sprout
The Easy Sprout is able to sprout just about any seed well. That is a big part of why we recommend it so highly.
These seeds are a Perfect match for the Easy Sprout:
Leafy Sprouts -Alfalfa, Clover and Mixes - All
Broccoli, Radish, Mustard, Cabbage
Beans - Adzuki, Garbanzo, Lentils, Peas, etc. (see Mung Note below)
Mung Beans - Of all our sprouters, Easy Sprout is by far the best for growing big, thick rooted Mung Beans. One of the keys to growing these is the ability to apply weight directly to the growing beans. We use a second Easy Sprout's Solid Base and Solid Lid, to hold water. It makes the perfect weight, and it fits perfectly into the Growing Vessel in which the beans are sprouting.
You should soak 1 cup of Mung Beans if you want to grow the biggest thickest roots as the mass created by the high volume of beans will aid in the root growth.
Exotics - Garlic, Dill, Fenugreek, Onion, etc.
Grains - Amber Waves, Wheat, Oats, Barley, Spelt, Rye, etc.
Nuts, Seeds and Pseudograins - Market Mix, Almonds, Pumpkins, Peanuts, Sunflower, Buckwheat Groats, Quinoa, etc.
Critter Sprouts - Big Bird, Mid Bird, Lil Bird, Dr. Bird, 4 Legs of Love
Pre-Sprout The Easy Sprout is also a great Pre-Sprouter for: Grass, Greens and certain Micro-Greens.
Possible but Silly:
The Easy Sprout is a great Pre-Sprouter for these items, but it is not designed to grow these crops to completion:
Grass - Neither Grass nor Greens will grow well, in the Easy Sprout, but it can be a fun experiment. Grass will grow without soil and can stay moist in the Easy Sprout - and get quite tall. It takes longer without soil, but in theory you can juice the entire mass (grass, grains and roots) so it may be worth a try - just for the fun of it.
These Greens can work as an experiment:
Buckwheat Lettuce Pea Shoots Radish Greens
The depth of the device is the only issue, but they all grow fairly well without soil, so give it a try if you're looking to EXPERIMENT.
Difficult to Impossible:
Other Greens and Micro-Greens will not work well - even as an experiment. Most require more horizontal freedom and some (the sunflowers especially) do much better with soil. But - don't let us stop you from trying! You should remember that some of the Micro-Greens are mucilaginous and therefore form a sticky gel sack. Those seeds will make a mess of your sprouter and they will never sprout!
Easy Sprout Notes
If you have a Small Seed (Alfalfa) Insert that is not snapping into place in the base of the Growing Vessel: Using any pliers - crimp the thin outer lip of the Insert in 2-4 places around the circumference. This will form tiny bulges that will make it snap as it should. We've been doing it for years as we have dozens at home that we use constantly =:-)
Easy Sprout is 3 1/4 inches on the bottom and 4 1/2 inches on the top. It is 7 inches tall. It has a 1 liter/quart capacity. It is made of High Density Polyethylene (Fortiflex® T50-3600 HDP) - which is one of the few non-leaching plastics. The Easy Sprout is also Kosher - we kid you not.
Easy Sprout Assembly
The Parts:
1) Growing Vessel 2) Base (solid) 3) Small Seed Insert 4) Dome Lid 5) Flat (Storage) Lid 6) Flat Vented (Travel) Lid 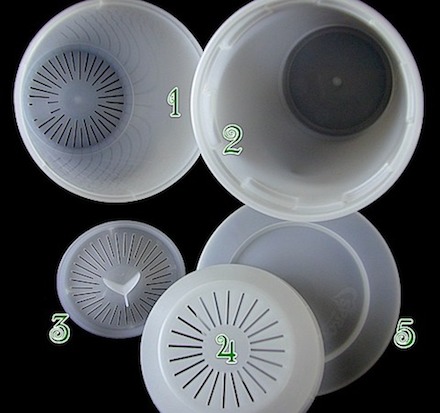
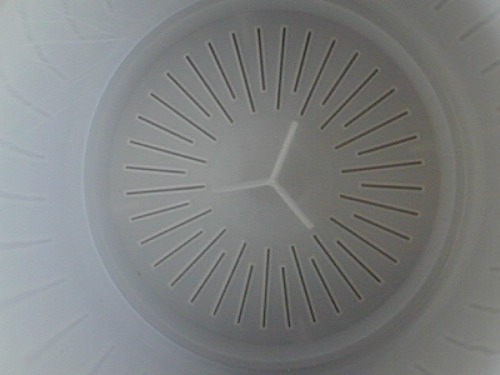
The Small Seed Insert (#3) (aka the Alfalfa Insert) 
If sprouting small seeds like Alfalfa, Clover and Broccoli snap the Small Seed Insert into the bottom of the Growing Vessel.
You will hear it snap into place when you push it to the bottom of the Growing Vessel. Note: Once in a great while a Small Seed Insert will cease snapping into place. To remedy this, take a pliers (needle-nose is perfect, but any will do), and slightly crimp the lip of the Small Seed Insert in 3-4 places - spaced evenly. Voila!
For Soaking: Place the Growing Vessel in the recessed position, inside of the Solid Base.
The Growing Vessel is shown here in a recessed position, where the rim of the Solid Base (2) is higher than the Growing Vessel.
When Rinsing: Remove the Growing Vessel and hold it under your sink's tap, or sprayer.
In between Rinse/Drain cycles- make sure the "Hangers" (I sometimes call these "teeth"), on the outside rim of the Growing Vessel are sitting on top of the "Bumps" on the inside of the Solid Base. Rest the Dome Lid - in the upright (or inverted - if your seeds/sprouts are lower then the lid is) position - on the lip of the Growing Vessel.
Note - the Dome Lid does not snap on - it just rests there. Note - Though it is theoretically unnecessary to elevate the Growing Vessel during sprouting, we think it is good practice to do so - especially in hot/humid conditions, when any extra air-circulation is helpful.
Travel Sprouting
While Sprouting (between Rinse/Drain cycles): Set the Growing Vessel inside the Solid Base and snap the Flat Vented Lid onto the Solid Base.
Though the Flat Vented Lid is specifically for Travel Sprouting, it can be used at home - if you insist. Don't forget the Small Seed Insert, if you're growing small seeds into sprouts.
Everything Else
Cleaning: Scrub well between crops with soap and water. Rinse well!
Sterilize: Soap and water usually do the trick, but you can use something stronger every several crops. We used bleach back in the day, but we don't anymore, unless absolutely necessary. There are many options these days, and though an unclean sprouter can cause your crop to fail - we suggest food grade hydrogen peroxide or grapefruit seed extract - or anything else you are comfortable with. We might even offer something by now, for sterilizing. Whatever you go with, do remember: It is always true, that a sterile sprouter is a great place to begin a crop.
Replacement Parts: When you purchase an Easy Sprout, you get everything you need. Every box contains all 6 parts. Folks do misplace a part now and then, so we offer some of the parts individually. We offer the Small Seed Insert, the Flat Vented Lid, and the Flat Solid Lid. Follow those links to get to the pages where you can purchase them, if you need them.
Manufacturer's Instructions: We love Gene, the inventor and producer of Easy Sprout. He is a true sproutperson. The greatest of them all! But, his instructions - which accompany every Easy Sprout - are off-the-wall. Other sprouters have zany instructions as well, but Gene's are the zaniest. We have, since day one, pleaded with our patrons, to avoid them - instead suggesting you follow our instructions. We're saying the same thing here. Read them, enjoy them, experiment with them when you feel you are up to the challenge, but PLEASE use our instructions. You'll get the best possible results when you do.
This is so easy to use. The sprouts come out perfect every time. I use it with the parrot sprouting seeds.
I had one of these years ago, but was not thrilled with the way the insert always fell out when I was rinsing the sprouts or seeds. Thank you, Gil, for adding that extra note about crimping the edges of the insert plate! I ordered new ones based on that piece of info, and I am having a much better experience with my new ones. These really are excellent for every level of sprouting, new folks or old hands. Glad to have these again, and have them WORK correctly this time! Thanks so much.
My second one. Love them, they are truly EASY!
This is amazing - my first mission was with alfalfa and broccoli sprouts. I've tried the small lids, and the stainless steel sprouter with limited success. I am amazed by the Easy Sprout Sprouter and I now have my first large batch of sprouts from those tiny tiny seeds. I think I'll need to have a few more of these units. they work.
Best sprouters on the market!!
