
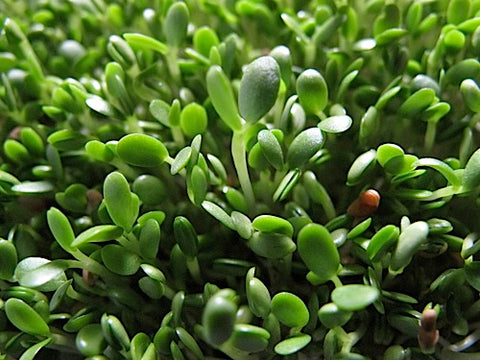
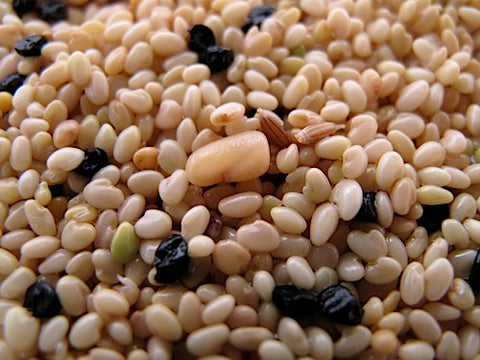
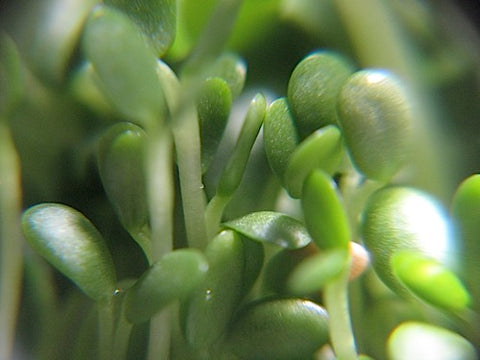
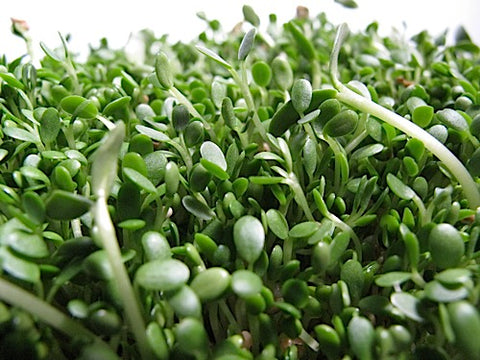

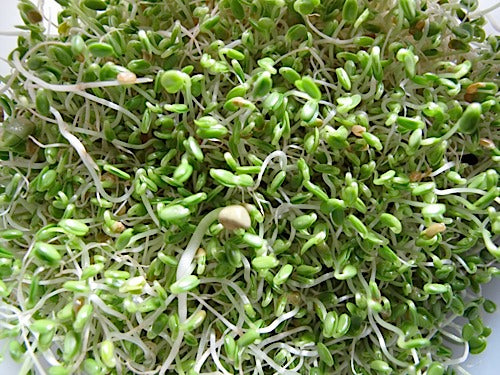
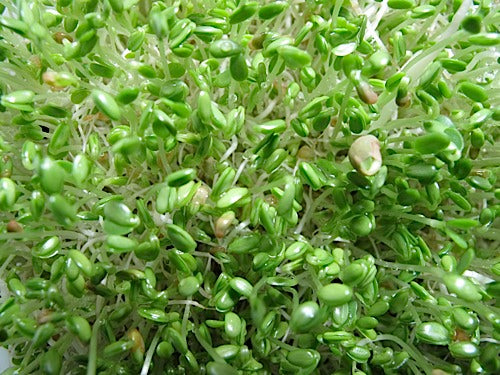
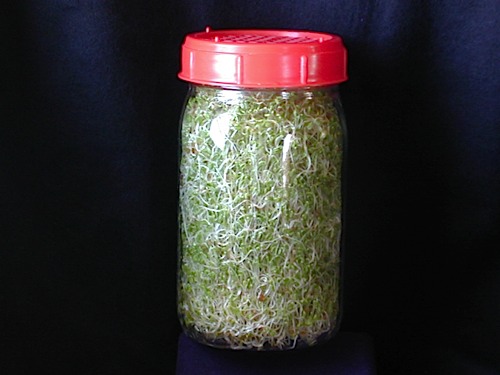
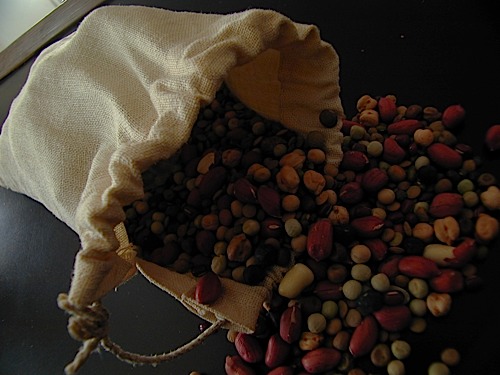
Russian Mix Sprouts
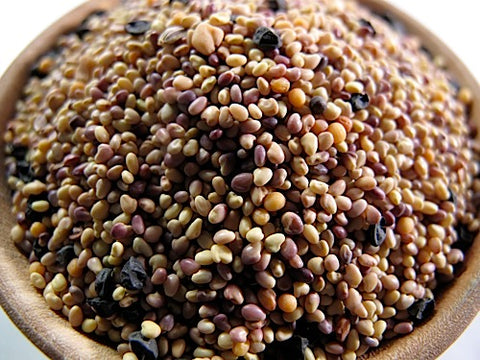
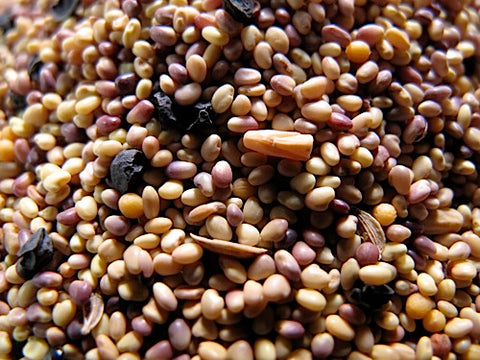
Clover, Onion, Mustard, Dill, Fenugreek
The favorite around our house, Russian Mix was our first gourmet geographically named Leafy Sprout blend. It runs neck-and-neck with Italian Blend, for Leafy Sprout popularity among our customers.
Vitamins A, B, C, E and K
Calcium, Iron, Magnesium, Phosphorus, Potassium, Zinc
Carotene, Chlorophyll, Amino Acids, Antioxidants, Trace Elements
Excellent for Women
Mild and crunchy with a touch of savory onion. Great in sandwiches, salads, or as a salad by itself! An essential part of a perfect bagel.
The amount of Russian Mix Sprouts produced by 1 unit of Seed. For Example 2:1 means that 1 pound of Seed will produce 2 pounds of Sprouts or whatever crop you are growing. You do not have to grow them all at once of course, unless you wish to =:-D
The time it takes to grow a finished 5 - 6 days, or other crop (Micro-Greens, Grass, Greens) from a dry Seed. Note: This "finished" Sprout is our preference. you may grow them for as long as you want! In fact, we suggest that you taste them at every rinse to discover when you like them best.
How to Grow Russian Mix Sprouts
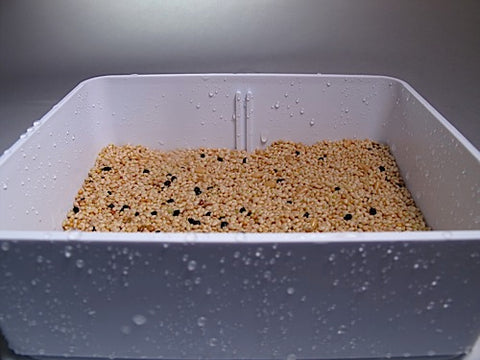
- Soak 2 Tbs. of seed in cool water for 8-12 hours.
- Drain off soak water. Do not ever soak again.
- Rinse thoroughly.
- Drain Thoroughly.
- Rinse and Drain with cool water every 8-12 hours.
- On day 3, move your Sprouter to a well lit location. Use direct sun only if you're growing in a tray.
- Continue to Rinse and Drain every 8-12 hours.
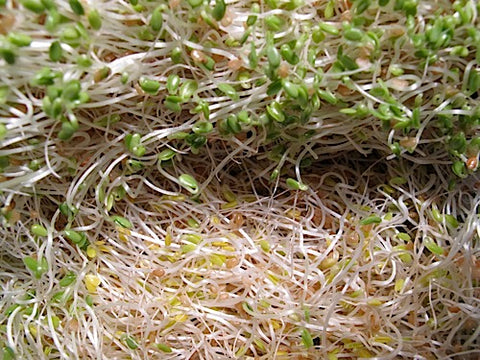
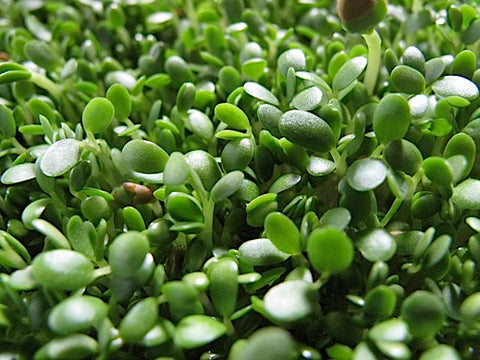
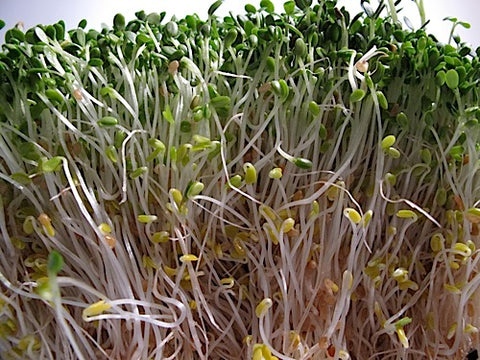
- Harvest on Day 6, when the leaves are open and most of them are green.
- De-Hull your crop if you like before Refrigerating.
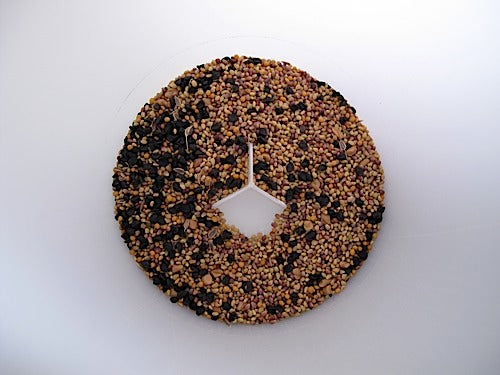
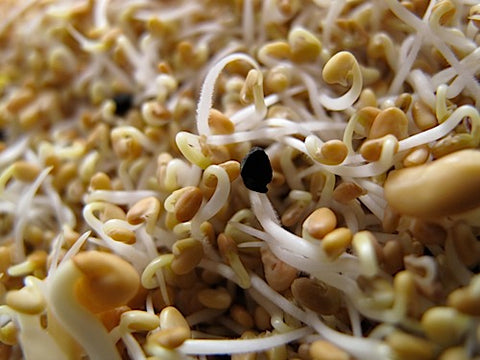
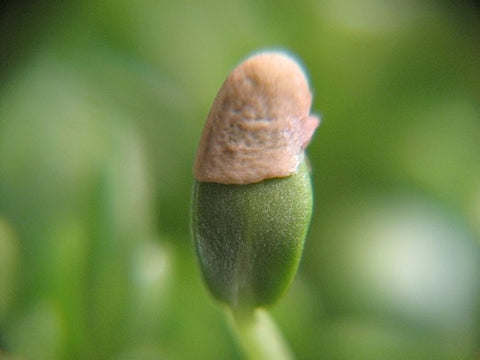
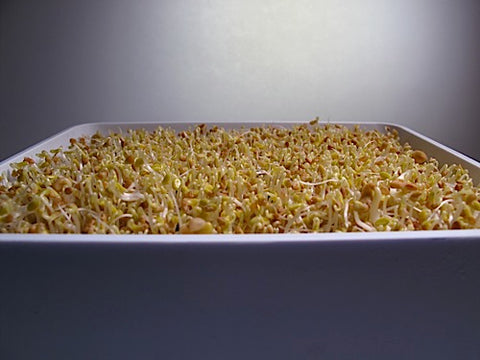
Russian Mix awaits Soaking.
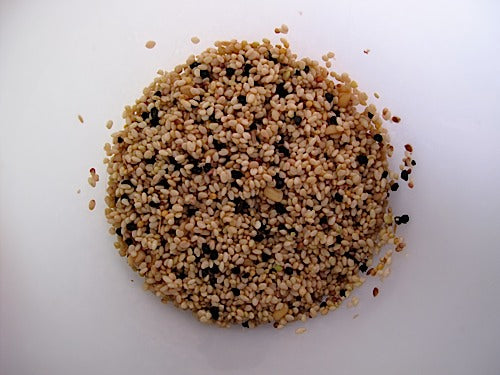
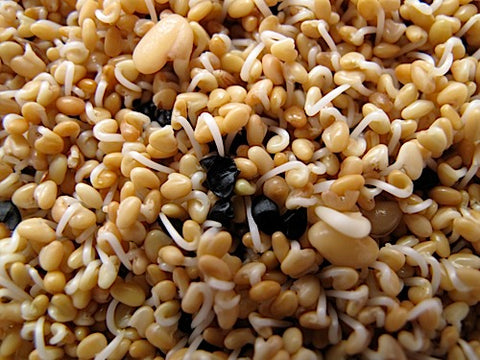
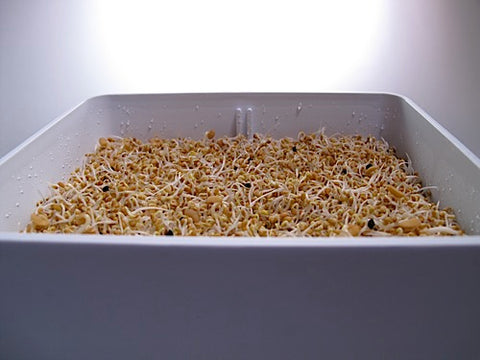
12 hours later... Soaked, Rinsed and Drained thoroughly.
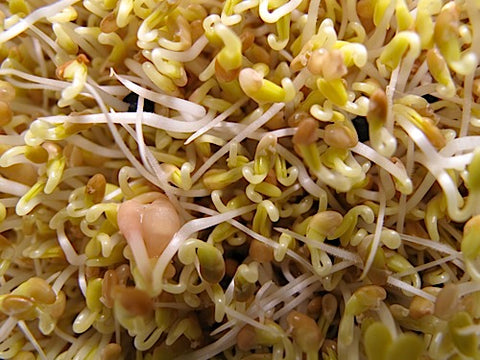
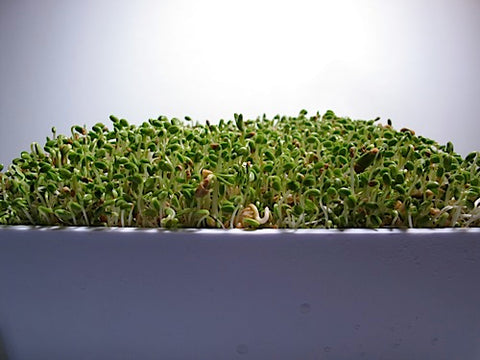
12 hours later... another Rinse/Drain cycle.Remember to be Thorough - especially in your Draining.
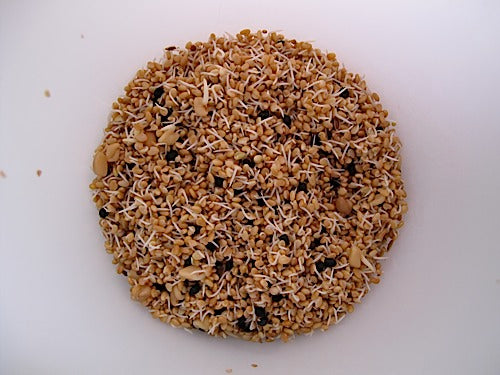
12 - 24 hours later... another Rinse/Drain cycle, or two.

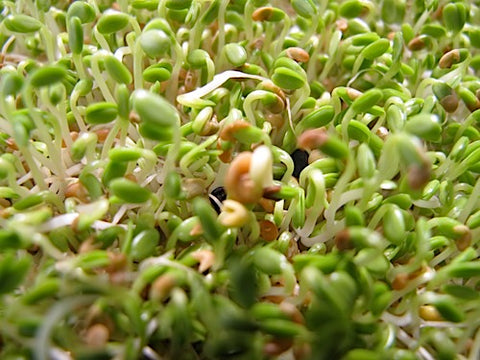
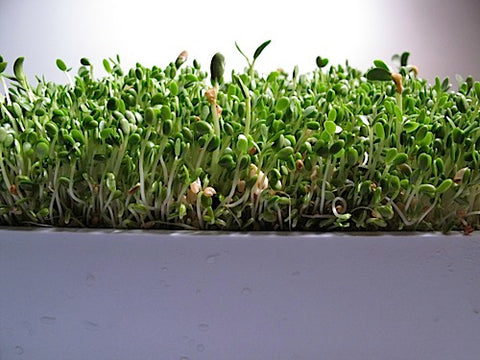
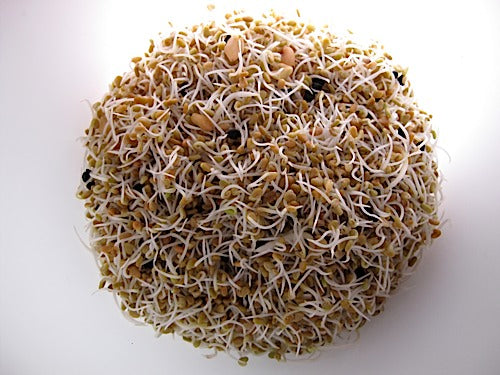
24 hours later... another 2 Rinse/Drain cycles.
24 hours later... another 2 Rinse/Drain cycles.
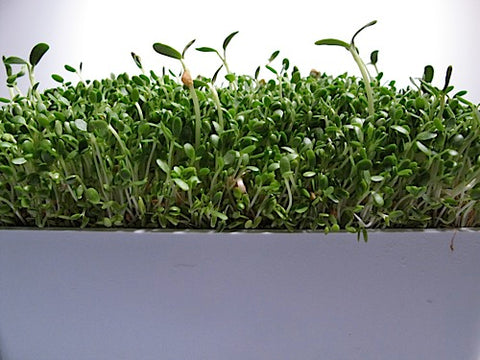
24 hours later... another 2 Rinse/Drain cycles. On your very last cycle - remember to Drain especially thoroughly, unless you are using a De-Huller - in which case thorough will do.
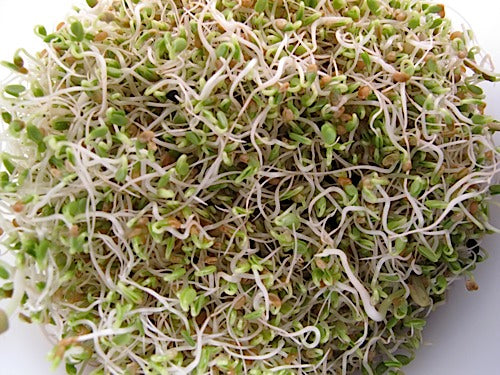
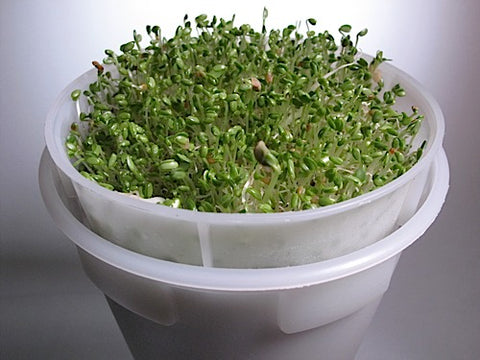
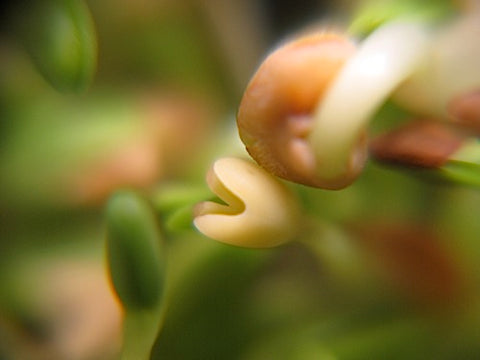
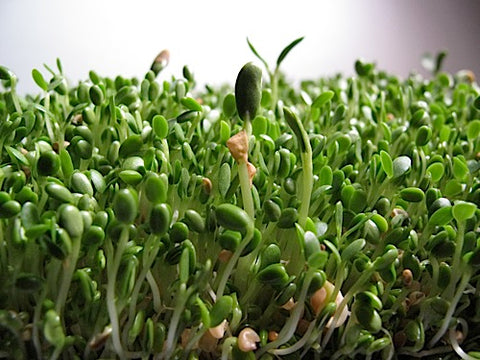
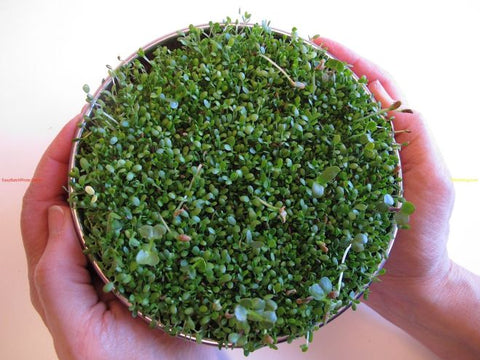
24 hours later.... Harvest Time!
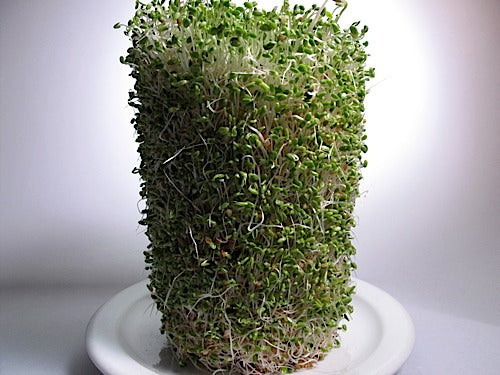
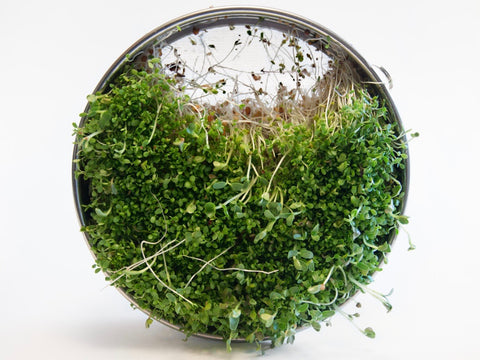
Behold! Removed from the Easy Sprout, the sprouts form a strong mass - a tree - a loaf - a pillar of sprouts! This is the same for all Leafy Sprouts.
Russian Mix awaits Soaking.
12 hours later... Soaked, Rinsed and Drained thoroughly.
12 hours later... another Rinse/Drain cycle.Remember to be Thorough - especially in your Draining.
12 - 24 hours later... another Rinse/Drain cycle, or two.
24 hours later... another 2 Rinse/Drain cycles.
24 hours later... another 2 Rinse/Drain cycles.
24 hours later... another 2 Rinse/Drain cycles. On your very last cycle - remember to Drain especially thoroughly, unless you are using a De-Huller - in which case thorough will do.
24 hours later.... Harvest Time!
Behold! Removed from the Easy Sprout, the sprouts form a strong mass - a tree - a loaf - a pillar of sprouts! This is the same for all Leafy Sprouts.
Yields approximately 4 Cups (1/2 lb.) of Sprouts
Seed Prep
Measure out 2 Tablespoons of seed* (slightly heaping) into your Sprouter or a strainer.
Rinse your seeds to remove dust and debris.
Soak
Transfer your seeds into your Sprouter (if necessary), or to a bowl.
Mix seeds up as you slowly add water to assure even water contact for all.
Add 2-3 times as much cool (70-80°F) water.
Allow seeds to Soak for 4-12 hours.
Do Not Ever Soak Again. Soaking is done only this one time.
We start counting days at this point - when the Soak is done (post-Soak is the phrase we use).
A crop of Leafy Sprouts usually takes 6 days - from This point in time to harvest.
Sprouting
Empty the seeds into your Sprouter (if necessary).
Drain off the soak water.
You can use it - it has nutrients in it. We use it on house plants.
Rinse thoroughly with cool (70-80°F) water.
Drain thoroughly.
Draining Thoroughly (Maniacally even) is the key to great crops. The smaller the seed (all Leafy Sprouts are small seeds) the more thorough you must be. Do Not skimp on Rinsing - but focus seriously on Draining.
If you need to see what we mean by Thorough Draining - check out our videos.
Set your Sprouter anywhere out of direct sunlight and at room temperature (70° is optimal) between Rinses.
This is where your sprouts do their growing. We use a counter top - in the corner of our kitchen, where the sprouter won't get knocked over by cats, dogs, kids or us. Indirect sunlight is fine, as is your regular room light - because light just does not matter much in the first couple days.
A plant can only perform photosynthesis when it has leaves. Until a plant has leaves, light has little if any effect. Sprouts also happen to like air-circulation, so don't hide your sprouts. When leaves do appear, this will be plenty of light for them to green up. You can also use Grow Lights if you like.
Rinse and Drain again every 8-12 hours for 3 days.
Always be sure to Drain very thoroughly. The most common cause of inferior sprouts is inadequate drainage. Even the best designed Sprouting Device holds water, so pay special attention to this step.
Greening
On the 4th day (post soak) relocate your sprouts, if necessary.
If you've been keeping them away from light - move them. Avoid direct sun as it can cook your sprouts, unless you are growing in a Tray Sprouter - in which case direct sunlight is great. Indirect sunlight is best for non-tray Sprouters but grow lights work well too. Experiment - you will be amazed at how little light sprouts require to green up. Photosynthesis is a marvel!
Continue to Rinse and Drain thoroughly every 8-12 hours.
Your last Rinse and Drain will be either at the end of day 5 or the start of day 6.
Always Drain Thoroughly.
Finishing
Your sprouts will be done about the end of day 6.
The majority of sprouts will have open leaves which will be green. You'll recognize them.
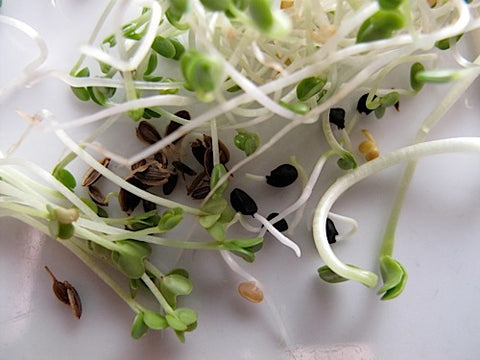
De-Hulling
Hulls are the thin coat on a seed. In most cases they separate themselves from the sprout. They are only a problem when it comes to the shelf life of your finished crop. We've eaten them for years and consider them extra roughage, but the crop looks better and lasts longer without them - so removing them is good.
You may De-Hull your sprouts at any time during day 5 or 6.
If you have a Salad Spinner - De-Hulling can be your last step. You can harvest and refrigerate them immediately after you finish.
You can also remove hulls prior to harvest...
If you are growing in a Jar - using the Coarse Mesh Screen will allow some hulls to float out through the screen while Rinsing. Repeating and agitating your sprouts will allow more hulls to escape.
If you're growing in an Easy Sprout Sprouter - transfer your sprouts to the Solid Base, fill with water, and agitate with a fork. This will help hulls get to the surface - where you can skim them off. When you've gotten all you can - move your sprouts back to the Growing Vessel, Rinse again, and Drain Thoroughly.
If you're growing in our Stainless Steel Sprouter you can get rid of most of the hulls by Rinsing Upside Down. Instead of writing words - let us direct you to our short video on the subject: Rinsing Leafy Sprouts Upside Down
Here is our video on De-Hulling.
Harvest
If you De-hulled with a salad spinner - you can go right to refrigeration. If not... Your sprouts are done 8-12 hours after your final Rinse and Very Thorough Draining. If we minimize the surface moisture of our sprouts they store much better in refrigeration, so we let them sit for 8-12 hours after that final Maniacal Draining.
Storing Your Crop
Transfer your sprout crop to a plastic bag or the sealed container of your choice. We have Produce Storage Bags that can extend shelf life substantially.
Leafy Sprouts are best within a week of harvest, but we've had some crops last for over a month in the fridge.
Great work sprout farmer!
*Amount of Seed to Use
* If using Sproutpeople's Single Harvest Pack - use the whole bag (for a one-quart Sprouter). It will produce a crop of approximately 8 ounces.
These seeds yield approximately 7:1 - which means the sprouts will weigh 7 times as much as the seed you start with, but, they will increase even more in volume - so don't start with more than 2 (heaping) Tablespoons per quart/litre of sprouter capacity.
Our personal favorite among the Leafy sprouts and also the most senior of our mixes. It is the perfect accompaniment to a bagel. Oddly, I (Gil) used to hate sprouts (I mean Hate!) at age 19, when I moved to San Francisco (from Chicago), they put sprouts on everything - including bagels. It really infuriated me. But now, I eat Russian Mix topped bagels at an alarming rate - have for years - sometimes without anything else - just a toasted bagel with Russian Mix. Moral: Never say never. =:-D
We include a lot of Onion in this mix because it is slower to sprout than the rest of the seeds. The volume of onion seed provides the flavor we are after, but when we sprouted this for our farmers market, we sprouted the Onion for several days and then mixed the sprouts in with the other seeds - after they have sprouted for a day. That method uses less Onion - and the texture is slightly improved - but, over the years we have found that mixes that require 2 steps often scare folks away - that's why we sell this as a one-step mix. We may be add a 2-step option in the future for those of you who don't mind the challenge and want to experience Russian Mix in its most total glory. In the meantime, you can always pump it up by buying some Onion straight and sprouting it for 5-7 days before soaking the mixed seeds.
Seed Shelf Life: 1 year. Store in cool, dark, dry spot. Store in freezer to extend shelf life.
Sprouting Devices for Leafy Sprouts
Follow links for detailed information about - and a purchase point for - each Sprouter....
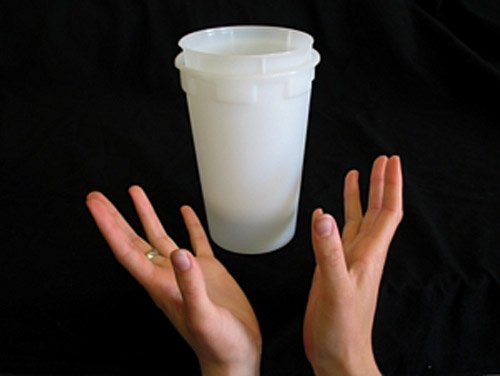
Easy Sprout
Overwhelmingly our most popular sprouter, Easy Sprout is also our personal favorite. We have well over a dozen in our house. It offers great drainage and the best air-circulation of any sprouter.
Easy Sprout is made up of a 1 Quart (litre) Growing Vessel, a Solid container/Base that catches excess Rinse water, a Small Seed Insert that snaps in when sprouting small seeds, two Growing Lids (1 for home (Domed) and 1 for the road (Flat)), and a Solid Lid for refrigerator storage of your sprout crop.
Easy Sprout is the best all-around sprouter. Period. It is the mandatory choice for high humidity sproutpeople everywhere and great for travel sprouting! Very versatile - Easy Sprout can sprout virtually any seed, anywhere!
Easy Sprout is part of many of our Kits.
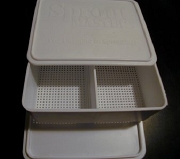
SproutMaster 5x6
SproutMaster is the greatest tray sprouter ever! It offers excellent drainage, and is the best sprouter on this globe, for growing vertical Leafy Sprouts. The SproutMaster is very versatile - it can sprout virtually any seed. It is even able to grow Grass, Greens and Micro-Greens - with proper care, and perhaps a growing medium.
We sell two configurations 1) Three trays that measure 5x6 inches each. 2) A Single tray that measures 8x10 inches. SproutMaster trays (of the same dimension) are stackable - add trays to build your own sprout skyscraper. SproutMasters are comprised of Growing Trays, each with a removable Divider - which allows you to grow 2 crops in one Tray, and interchangeable Lids and Bases.
This SproutMaster is the 3 Tray, 5x6 Stack. It comes with 3 Trays, 3 Dividers, and 4 Lids/Bases. That is enough Lids/Bases for almost anything you want to grow.
SproutMaster 8x10
SproutMaster is the greatest tray sprouter ever! It offers excellent drainage, and is the best sprouter on this globe, for growing vertical Leafy Sprouts. The SproutMaster is very versatile - it can sprout virtually any seed. It is even able to grow Grass, Greens and Micro-Greens - with proper care, and perhaps a growing medium.
We sell two configurations 1) Three trays that measure 5x6 inches each. 2) A Single tray that measures 8x10 inches. SproutMaster trays (of the same dimension) are stackable - add trays to build your own sprout skyscraper. SproutMasters are comprised of Growing Trays, each with a removable Divider - which allows you to grow 2 crops in one Tray, and interchangeable Lids and Bases.
This SproutMaster is the single 8x10 inch Tray. It comes with 1 Tray, 1 Divider, and 2 Lids/Bases. If you purchase multiple 8x10 trays, you'll end up with more of the Lids/Bases then you'll use regularly, but extras can be a good thing....
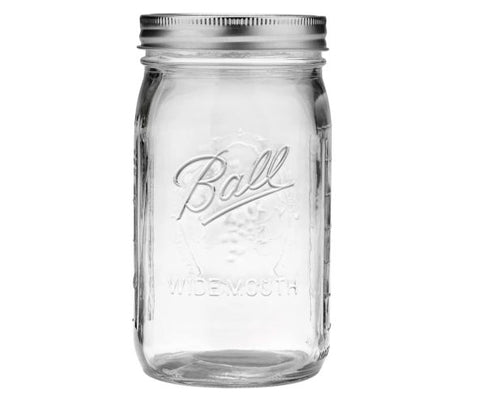
1 Qt. Jar
This is a One-Quart, Wide-Mouth Mason Jar. It isn't accompanied by a lid. Those are purchased separately. Keep on scrolling....
The least expensive, most basic sprouter, Jars - when topped by Screen Lids, are a fine choice for any skilled sprouter or for those willing to work a bit more diligently at rinsing and draining, or as an additional Sprouter, for easy sprouts, like Beans and Grains. A great choice for Pre-Sprouting Grass and Greens too!
Half-Gallon Jar
This is a Two-Quart (1/2 Gallon), Wide-Mouth Mason Jar. It isn't accompanied by a lid. Those are purchased separately. Keep on scrolling....
The least expensive, most basic sprouter, Jars - when topped by Screen Lids, are a fine choice for any skilled sprouter or for those willing to work a bit more diligently at rinsing and draining, or as an additional Sprouter, for easy sprouts, like Beans and Grains. A great choice for Pre-Sprouting Grass and Greens too!
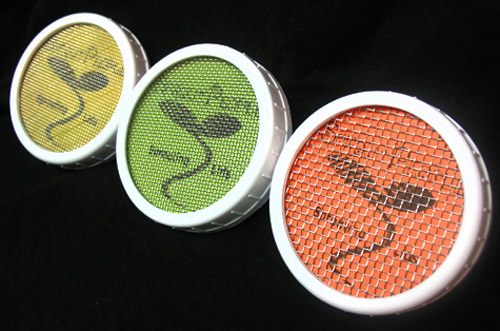
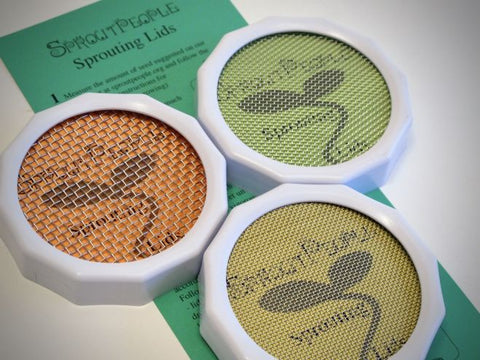
Sproutpeople Stainless Steel 3-Screen Sprouting Lid Set
Made by Sproutpeople!
Fine mesh, Medium mesh and Coarse mesh. Our 3-Screen Lid Set is made up of Stainless Steel Mesh - in 3 different mesh sizes (fine, medium and course) - each nestled in a heavy-duty Plastic Ring. Our Screen Lids fit Wide-Mouth Jar Mason Jars, like those we sell.
The wider the mesh - the more readily water and air pass through the screen. Use the fine mesh (the finest mesh size ever!) for small seeds (Leafy and Brassica sprouts), the medium mesh for Grains and small Beans and the coarse mesh for large Beans. As your sprouts grow bigger, you can move to a bigger mesh size to improve air-circulation and facilitate the escape of hulls, thus making de-hulling easier.
Additional Sprouters
You can also grow Leafy Sprouts as Micro-Greens using...
Follow links for detailed information about - and a purchase point for - each Sprouter....

Compostable Tray
A very simple tray just for Micro-Greens! The Compostable Tray is a small, inexpensive and attractive way to hold a growing medium - specifically Baby Blanket. It's great for growing small crops of Micro-Greens, decorative growing and growing at work.
Using the Compostable Tray is extremely simple. Just sprinkle small seeds on the moist Baby Blanket pads and watch 'em grow! Well, there's a tiny bit more then that, but not much.
Not a big crop sprouter, but very inexpensive and attractive as Sprouters go! The Compostable Tray comes with a compostable, clear cover and measures 4x7 inches.
Hemp Bag
Made by Sproutpeople!
The perfect Bean and Grain sprouter. The Hemp Bag is even capable of growing Leafy and Brassica sprouts - though it takes extra care to do those well. It's also excellent for Micro-Greens - it acts as a planting medium.
The Hemp Bag is the most convenient travel sprouter ever. It folds up flat and does a great job hanging on a backpack, on a boat or over a hotel sink!
The Hemp Bag offers superior drainage and exceptional air-circulation.
Our Hemp Bags are made for us, locally. They measure Approximately 6 1/2 inches wide x 9 1/2 inches tall.
The shelf life of sprouting seeds (how long the seeds remains viable - able to germinate) varies quite a bit. Though most seeds will remain viable for years in reasonable storage (dark, cool and low humidity), some will not. We suggest that you freeze your seed. Freezing extends the shelf life of a seed by several years. The only concern in freezing is condensation. All you need to do to avoid condensation is to return the seed to the freezer within a few minutes - after you've removed what you need, to grow your current crop. Also, Keep them in any sealed container. A plastic bag is fine. Glass is better. You do not need to thaw the seeds - just go ahead and Soak.
Sprouting NotesWhen conditions are warmer your sprouts will likely grow faster. Likewise they may grow slower if conditions are very cool. As always 70° is optimal.
All sprouts generate heat while growing, which is a good thing, but it can get out of hand on occasion. When the weather is especially hot and humid you will do well to Rinse more frequently (every 8 hours if possible) using colder water than usual, to compensate.
We grow our sprouts almost exclusively in Easy Sprout Sprouters. By day 4 we have hulls coming off our sprouts, so we allow the hulls to escape. We do this by leaving the Growing Vessel inside the Solid Base of the Easy Sprout and then filling it with water. We use a fork to loosen the mass of sprouts, which allows more hulls to float to the surface. We skim the hulls off and compost them. It isn't necessary to do this because we De-Hull them when we harvest the crop, but it's a way to spend more time with your sprouts. We like to do that. It's possible that we're a bit odd that way - - but you see - sprouts are sorta part of our family - - hmmmm - I don't imagine that makes us seem less odd. Let's just leave it there. We are who we are @:-)
Depending on your Sprouting Device, not all of your sprouts will have access to light and so some will not green. This is not only OK - it is good. The yellow sprouts will be equally nutritious (they have everything but chlorophyll) and many think them more delicious (in Europe vegetables are often grown "blanched" by being denied light). We think they are prettier when there is a mix of green and yellow leaves to go with the white roots. So don't sweat it - just eat more sprouts!
When using a non-tray sprouter, you can help your crop by "breaking apart" your sprouts when they clump up - around day 3 or 4 and daily thereafter. We use high water pressure when Rinsing to keep our sprouts loose, but this only works for so long - so - when water isn't enough, loosen the clump of sprouts up using a fork or your fingers (wash your hands first please, if they need it). If you are using a Sprouter that can hold water, like Easy Sprout - fill it mostly full then use a fork to loosen the clump. You could also dump your sprouts onto or into something and just shake them apart. This clump loosening is by no means mandatory - but it will help more of their leaves to turn green. You should never be afraid*** of touching your sprouts. They are much stronger then they appear - just be reasonably gentle.
*** The only thing to fear is fear itself.
Alternate Growing Methods
Vertical Growing
This method produces very pretty sprouts that green most evenly and whose hulls are removed most easily. They do not however, taste any better =:-}
If you grow in a Tray sprouter - like SproutMaster, your sprouts can grow vertically - leaves (cotyledons) up, roots down. The trick to doing this is to keep your sprouts in place (don't "break them up" as you do in a non-tray sprouter) from day 3 onward. It is easy to do if, when Rinsing, you use a sprayer (that attachment most sinks have - the one that pulls out and is gun-like or a faucet attachment that offers spraying when pulled down) instead of your faucet. We have grown many tons of leafy sprouts this way. Here is a breakdown of the specifics (rinse numbers are based on 12 hour intervals - adjust as needed):
Rinse 1 (right after Soak): Use faucet or sprayer and Rinse thoroughly (use water at high pressure and use plenty of it). Rinse 2 and 3: Use faucet or sprayer and Rinse thoroughly. Rinse 4: Use sprayer and while Rinsing thoroughly, spray your sprouts evenly across the bottom of the tray. You can use your hands to spread them too. The goal is to spread them evenly. Rinse 5 and 6: Use sprayer with less water pressure. Rinse well - (which since you are using less water pressure means - for a longer time) but don't disturb the sprouts. Rinse 7 - 10: Use sprayer. You can turn the water pressure back to high - your sprouts will not be easily moved (broken up) at this point and the higher water pressure feeds oxygen to your sprouts as well as "cleaning" them, which is a wonderful way to produce healthy long lasting sprouts. Rinse and Drain thoroughly. Rinse 11 (if you need this many) or your last Rinse: Use Sprayer. Hold your tray at an angle (90° will work but less is OK too) and spray across the top of the sprouts to remove hulls. We call this SHAVING. It can be done at any Rinse or every Rinse - starting when hulls begin to be shed by the opening leaves. Rinse down into the sprouts too.
Vertical growing CAN be done without a sprayer too but it is more difficult. If you want to try all you have to do is regulate your water pressure - trying to keep your sprouts undisturbed during rinses 4 - 6.
Growing Leafy Sprouts as Micro-Greens
We have posted instructions to do this Here: Leafy Sprout Micro-Greens.
Recommended Sprouters for Russian Mix Sprouts

LOVE these and the Italian blend for topping bagels. Lately I've been sprouting them together - 1 Tbsp of Italian Blend, and 1 Tbsp of Russian Mix. It's like having everything bagel sprouts thanks to the garlic and onion sprouts. Even better when you put these on an actual everything bagel!
LOVE these and the Italian blend for topping bagels. Lately I've been sprouting them together - 1 Tbsp of Italian Blend, and 1 Tbsp of Russian Mix. It's like having everything bagel sprouts thanks to the garlic and onion sprouts. Even better when you put these on an actual everything bagel!
Used the round metal sprouter for this crop on counter room temp . Put harvest in baggie in fridge. Within week had nice crop. Fed some to two mutts(which they really liked!) ans more for me! Very nice. Clean Damp paper towel helpes roots stay hydrated;
Spritz top
Used the round metal sprouter for this crop on counter room temp . Put harvest in baggie in fridge. Within week had nice crop. Fed some to two mutts(which they really liked!) ans more for me! Very nice. Clean Damp paper towel helpes roots stay hydrated;
Spritz top
Wow! Just received seeds n metal sprouter! Really appreciate the “how to” videos.
Really helps me. A lot!
I eat sprouts and so do dogs (they eat the sprouts twice daily, sparingly.
Always clean. Your successes are very
Likely! This activity takes little space and to me, thrilling seeing nature’s power.
Try some. Its good for your family and nifty for kids!
