

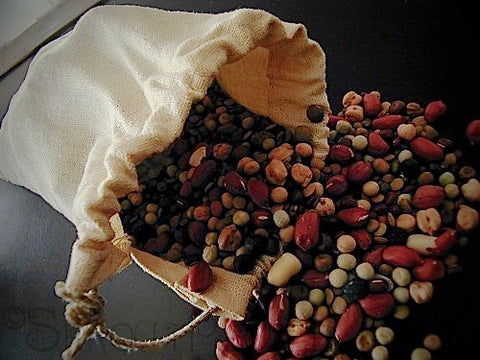
Organic Hemp Bag Sprouter
We are trying to find what and who we need to make these again - but until we do we are sorry to say we are out.
Made by Sproutpeople!
The perfect Bean and Grain sprouter. Our Hemp Bag is even capable of growing Leafy and Brassica sprouts - though it takes extra care to do those well. It's also excellent for Micro-Greens - it acts as a planting medium.
The Hemp Bag is the most convenient travel sprouter ever. It folds up flat and does a great job hanging on a backpack or over a hotel sink!
The Hemp Bag offers superior drainage and exceptional .
Our Hemp Bags are made for us, locally. They measure Approximately 6 1/2 inches wide x 9 1/2 inches tall.
Hemp Bag Sprouting Instructions
Specific Sprouting Instructions are found on the page devoted to the Seed or Mix you are interested in. Below are the specifics of the Hemp Bag
Seed Prep
Since the Hemp Bag drains so well, it is a very good device for cleaning your seeds prior to soaking. You can rinse through the open top of the Bag or through the sides. Water passes through this Bag as if it weren't there! Just run water through until the water runs clear.
If you are using the Hemp Bag only as a Seed Prep device, and sprouting in a different device; the transferring of the seeds can be a bit of a hassle. Big seeds (Beans, Grains, some Nuts, etc.) won't be much of a problem, but small seeds (Alfalfa, Broccoli, Radish, etc.) will probably be annoying enough to transfer that you should find another Prep device or go all the way with the Bag.
Soaking
After Prep you can either remove your seeds to a bowl or similar water holding unit, or you can submerge your Bag with the seeds inside it in a large water holding unit - like a pot. If you Soak your seeds while in the Bag, be sure they are all under water so that they can Soak properly.
Use cool (60 - 70°) water unless instructed otherwise by your seed supplier (us we hope =;-) and leave to Soak for 8 - 12 hours - or for the time noted on the detailed instruction page for the seed or mix you are sprouting.
Rinsing
You can Rinse through the open top of the Bag or through the sides. Water passes through this Bag as if it weren't there! Just run water through until the water runs clear. As an average we will run water through for about 15-20 seconds at every Rinse, but there is no hard rule. Always use cool (60 - 70°) water unless specifically instructed otherwise by your seed supplier.
Remember the rule of Bag Sprouting: Rinse More Often!
Sprouting
Hang your Bag up in a place where it can drip. We have a cabinet right above our sink and we hang our Hemp Bag on it's knob. That is perfect! Between Rinses is when your sprouts really grow. We like a room-temperature (70° is always optimal) spot with no direct sunlight.
Draining
If you hang your Bag you don't have to Drain at all, gravity will do it for you! As previously stated; Bag sprouters do not retain moisture as well as other sprouters, so though you don't have to Drain you do need to: Rinse More Often!
Greening
We always suggest a low-light, 70° location for your sprouter, until it is time for Greening (if you are growing sprouts that green (anything that grows a leaf - like Leafy or Brassica sprouts). At that point we often say: Move your sprouter to a brighter location (or words to that affect), and though we always say to avoid direct sunlight, we will remind you that if you do so with a Bag - it will very quickly dry your sprouts. So if you are Greening sprouts in a Bag, don't move them to a too bright a location, but rather, meditate on that other thing we say: You'll be amazed at how little light it takes to turn your sprouts green!
De-Hulling, Harvest and Crop Storage
If you are growing Leafy or Brassica sprouts, you can use our De-Huller to remove any remaining hulls, and dry your crop at Harvest time.
Before Harvesting any crop, it is essential that you Drain it Very Thoroughly after your final Rinse. Storing crops that are dry to the touch, maximizes their shelf life. This final Draining, when growing in a Bag - is easy! The Hemp Bag's fast drying alone, may shorten our recommended 8-12 hour wait before refrigerating your crop, but to take it to the next leve: Use your Hemp Bag for the ultimate Drain - hold tight the hemp rope that ties the top and pretend the Bag is an old-fashioned slingshot (like David's) - or that you are a centrifuge. Using full arm extension swing the Bag as fast as you can around and around - but don't let go. You might want to do this out of doors as a great deal of water can be released with this method. You can enjoy this unique sprouting experience even if you grew your crop in another sprouter - just transfer it to the Hemp Bag for this final Drain.
Do not Store Your Crop in a Hemp Bag. Though they can actually be good for produce storage, sprouts are too fine - so they'll dry out in your refrigerator. You should transfer them to a plastic bag, or our really great Produce Storage Bags, that actually extend shelf life of sprouts and other produce by allowing ethylene gas to escape. You don't really need those if you're going to eat your crop in short order. Whatever you are happy storing your crops in is fine, and fine with us.
Seed Specific Sprouting Instructions If you have a particular seed type in mind, read on to discover further details of Bag Sprouting that seed type. Refer to the seed's main information page for detailed instructions.
The Hemp Bag is possibly the easiest of all sprouters! The sprouting method is the same with all seeds and the growing method is the same with all Micro-Greens:
To Soak, you can either Soak your seeds in a bowl (or similar water holding equipment), or you can submerge your Hemp Bag - with the seeds in it - in a large water holding unit - like a pot. As long as your seeds are all under water you will succeed. To Rinse, either open the top or Rinse through the sides of the bag - or both. Water passes through the Hemp Bag as if it weren't even there. I generally open the top. To Drain, just hang the bag up above your sink - or on the faucet, and it will Drain itself. I'm a conflicted person in some respects, so please forgive me if I told you elsewhere on the site; to Drain differently. Really - a little shaking and twirling before hanging is a good idea, now that I think about it @;~) The only detail unique to the Hemp Bag (and all other Bag sprouters) is that they dry out and so...... yup you guessed it: you Rinse More Often! The extra Rinses are more important with small seeds, but you can usually get away with just 2 Rinses when growing big seeds, though extra Rinses can't hurt. The Hemp Bag's fast drying can be used to advantage: Transfer sprouts grown in other sprouters to the Hemp Bag for, or after their final Rinse. Not only will they dry faster - likely shortening the 8-12 hour wait before refrigeration, you can also hasten the process by using your Hemp Bag for the ultimate Drain - hold tight the hemp rope that ties the top and pretend the Bag is David's biblical slingshot or that you are a centrifuge. Using full arm extension swing the Bag as fast as you can around and around - but don't let go. You might want to do this out of doors as a great deal of water can be released with this method.
Sprouting Capacity = 1 Quart (1 Liter)
Beans
The instructions on the Seed Information page will give you all you need. The ONLY Bag specific point to factor in is: Rinse More Often!
Maximum dry seed to Soak is 2 cups - that much will fill the Bag with sprouts.
Mung Bean
For small sweet Mung sprouts follow the instructions on the Mung information page and Rinse More Often!
Maximum dry seed to Soak is 2 cups - that will fill the Bag.
Brassicas
These need to move while sprouting or they will form a root mass which is at least unpleasant and often lessens the sprouts' quality. Often by day 3 or 4, your sprouts will need to be separated to keep this mass at bay. So take a fork or use your (clean) hands to loosen them up. Alternately, you can transfer the sprouts to a container that holds water (a pot for example), fill it with water, use the fork or hand - it is often easier to break up the mass while they are in water. Keep breaking up the sprout mass every rinse or two. Rinse More Often!
Maximum dry seed to Soak is 4 Tablespoons.
Leafy Sprouts
One issue folks have with Leafy sprouts is that they expect them to be green. There are almost always - regardless of the sprouting method - some sprouts which will not turn green. Our advice is: Live with it! Most will green if you don't over-crowd the sprouter (use 2 Tbs. or less of seed per quart of sprouter) - and those that don't are still plenty delicious, nutritious and they add beauty (yellow goes well with green and white!). These also will do better if they are allowed to move freely, so break up the mass on day 4 and 5. It is not a critical issue with the Leafy Sprouts, but it does have the added benefit of allowing hulls to float away, if you break them apart while submerged in water.
Maximum dry seed to Soak is 3 Tablespoons.
Exotics
Rinse more often - and for a longer period of time - if you are growing the Alliums (Garlic, Onion) - these seeds require a couple weeks to finish, so you'll need to pay attention to keeping them properly moist over a longer period. For Dill - moisture is a different story, but it will also need that much time. The other seeds and mixes in this category (Fenugreek, Sweet Pea etc.) could just as easily be in the "Perfect Match" category, except the Mother's Mix which is basically a Leafy Sprout, so for that one, look up an inch or two.
Maximum dry seed to Soak varies depending on seed/mix. See detailed information page for specifics.
Grains
The instructions on the detailed Seed Information pages will give you all you need. The ONLY Bag specific point to factor in is: Rinse More Often!
Maximum dry seed to Soak is 2.75 cups - that will fill the Bag with sprouts.
Nuts and Seeds
The instructions on the Seed Information page will give you all you need. Sprouting Hulled Sunflower, Peanuts and Almond are all perfect for the Hemp Bag because they require so few Rinses that you won't even have to Rinse more often!
Maximum dry seed to Soak is 2.5 cups - that will fill the Bag.
Grass and Greens
Great for Pre-Sprouting! Full grown Grass or Big Greens just should not be done with our Hemp Bag sprouter - their roots could damage the bag. They're relatively big roots.
Critter Sprouts
Whether you're growing A Bird Mix or 4 Legs of Love - they require no additional information. Everything you need to know is on the mix' detailed instruction page.
Maximum dry seed to Soak is 2 cups - that will fill the Bag.
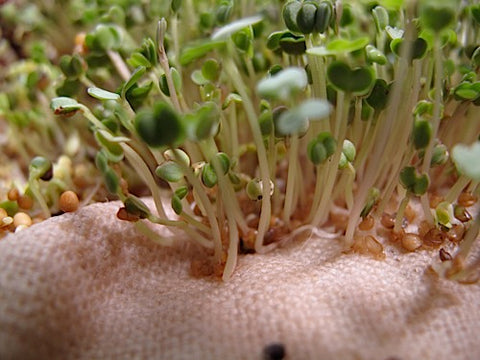
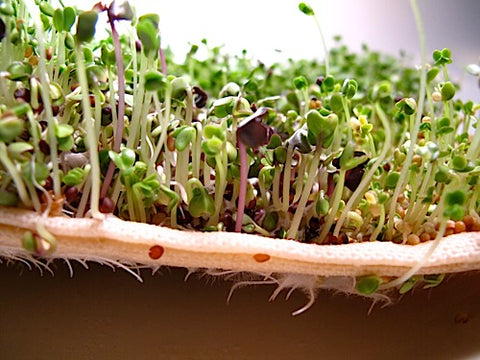
Micro-Greens
The detailed seed information page for the seed or mix you are growing will have detailed growing instructions. Here is the Hemp Bag method:
•Soak and/or Pre-Sprout if necessary - do not Soak straight Mucilaginous seeds! See the seed's detailed information page before you start!
•Lay the bag flat on a plate or in something like a baking pan - something in which it the whole Bag fits.
•Wet the Bag thoroughly.
•Spread seeds on Bag - don't crowd them, they want some room to breathe.
•You may cover that in which the Bag is laying during the 1st couple days to help retain moisture. Be sure to uncover when the Micro-Greens begin to grow. Covering is optional but we suggest that you experiment with covering to see what works best for you - in your climate and with the particular seeds you are growing. The most important factor is........
•Keep the bag moist (not so soaked that the seeds drown, just thoroughly moist).
You'll have a great crop of Micro-Greens in a week or three - depending on what crop you are growing and to some degree; your climate. Cut them off with a scissors and enjoy the ultimate gourmet vegetable. Cleaning the bag is easier if you pull the roots out as soon as you harvest your crop. Experiment and learn =:-}
Hemp is one of the most versatile and durable fibres known. Hemp was grown and used by the founders of the United States, and throughout our history - until midway through the 20th century. Hemp is an annual plant that can grow well in many climates, is easy to grow organically (Hemp requires no fertilizer and is naturally repellant to insects), and which replenishes the soil, as opposed to depleting it like many crops do. Hemp produces fibre from the plant itself which can be used to make paper and plastic (Henry Ford built a car out of Hemp plastic, and his tests proved it to be much more durable than petroleum based plastics!) as well as cloth. The seed of the Hemp plant is an extremely nutritious food, and can be used to produce oil.
Hemp is not grown in the US because it is related to marijuana. The US government thinks that if it allows Hemp production, marijuana production will rise, so it is illegal for farmers to grow it. It is even illegal to have seeds that will germinate (Hemp seeds imported into the US are supposed to be heated or treated - to kill them - so they won't germinate.) in the US! Ironically, if the US allowed Hemp production it would devastate the marijuana growers, who fear pollination of their plants. Hemp pollen travels farther than most so it would in fact threaten marijuana production! The politicians as usual have their heads in the sand. Their specious arguments agains Hemp are based on ignorance or deception - for what reason we know not. They do not understand that this plant is a sustainable wonder - which is funny because George Washington and Thomas Jefferson wrote quite adoringly of it! Thankfully our neighbors to the north - Canada are, as usual, ahead of us - they are aware of the benefits of hemp, so farmers are now cultivating it there. We hope this sanity soon spreads south of the border - to the US!!!
We hope to have Hemp Seeds (which taste fantastic raw and as sprouts) in the not too distant future! Wake up America - Hemp is NOT pot!
Learn more about this amazing plant, and help make Hemp legal by visiting our friends at Vote Hemp.
Our Hemp Bags are made from cloth woven tightly enough that they can sprout even small seeds like alfalfa, clover and broccoli - in addition to the big seeds, grains and beans - at which they have always excelled. You can even grow Micro-Greens on this bag!
Great for travel - including backpacking and sailing, as well as at home, this bag will last forever. The Hemp Sprouting Bag is absolutely beautiful in its simplicity and natural durability.
Growing Capacity: 1 Quart Per Quart you can grow: Up to 1 pound of Leafy Sprouts or 2 pounds of Bean or Grain Sprouts.
Sproutpeople's Hemp Bag measure Approximately 6 1/2 inches wide x 9 1/2 inches tall. Measurements may vary a little bit - we have these made for us locally, here in San Francisco.
Eat More Sprouts! Grow More Often! Grow More Easily!
For Sprouting Instructions, click the name of the Seed or Mix you want to grow.
FOR USE WITH THESE SEEDS/CROPS
Seeds to Sprout in the Hemp Bag
The Hemp Bag has the greatest Air-Circulation of any Sprouter - if you hang it between Rinses! We don't even Drain ours - we just hang it above our sink and let it drip. The downside is that Bag sprouters dry out - so you need to Rinse more often. That is all there is - you never have to Drain - you just have to Rinses twice as much!
These seeds are a Perfect match for the Hemp Bag:
Beans - All (see Mung Note below)
Grains - Big Grains: Wheat, Rye, Spelt, Oats, Barley, Kamut, Triticale, and even the little Grain: Millet
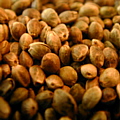
Nuts and Seeds - Almonds, Peanuts, Sunflower. These big seeds will do wonderfully in the Hemp bag. The others in this category appear in the "Next to Prefect" section, directly below.
Grass and Greens - Great for Pre-Sprouting only!
Micro-Greens - Any very small seed can be grown as a plant (when it buries it's roots in something and we harvest the crop by cutting, we call it a plant). Here are a few of the seeds that you can use to grow Micro-Greens: Mucilaginous: Cress, Arugula, Flax, Chia, Mizuna, Basil, Rape (Canola)..... Non-Mucilaginous: Alfalfa, Clover, Mustard, Radish, Cabbage, Broccoli, Cauliflower, Turnip, Kohlrabi, Kale, Collards.......
These particular Greens will do well grown ON the Hemp Bag! See the Micro-Greens information page and the information page for the seed you want to grow and look down here for details. Here are the basics:
Soak and/or Pre-Sprout if necessary - do not Soak straight Mucilaginous seeds! Lay the bag down on a plate and wet it thoroughly. Spread seeds on Bag - don't crowd them, they want some room to breathe. Keep the bag moist.
You'll have a great crop of Micro-Greens in a week or three. Cut them off with a scissors and enjoy the ultimate gourmet vegetable. Cleaning the bag is easier if you pull the roots out as soon as you harvest your crop. You may also use a second plate (inverted) as a cover during the 1st couple days to help retain moisture. Experiment and learn @:-}
Next to Perfect:
Mung Beans - Are Perfect for small sweet sprouted Mungs - a tiny 1/8- 1/4 inch sprout, but not for big thick Mung Bean sprouts - 2-3 inches long. If you want big thick Mungs use the Easy Sprout - it is perfect for that! Do read our Mung Bean page - especially the Notes section, for updates to this opinion - even after 17 years (as of this writing), I'm still learning.
Seeds and Pseudograins - Pumpkins, Buckwheat Groats, Quinoa, Amaranth, , Sesame. I put Pumpkin here because it is a relatively messy sprout. It sheds some of its thin seed coat after soaking, and so makes cleaning the bag a little more work. Aside from that, it's a perfect match for the Hemp Bag.
Leafy Sprouts: Alfalfa, Clover and Our Gourmet Mixes - Our tightly woven Hemp Bag is capable of sprouting these small seeds as well as any other. The only rule is this: Rinse more often - especially if humidity is low. The Hemp Bag breathes extremely well which is great in high humidity, but can lead to drying in low humidity conditions. The rule - as you may have guessed - is: Rinse more often. 3 times daily is nice.
Brassicas - Broccoli, Radish, Cabbage, Mustard, etc. Like Leafy Sprouts, these small seeds can grow well in the Hemp Bag - but do Rinse more often.
Exotics - Fenugreek, Sweet Pea, Garlic, Onion, etc. Rinse more often - and for a longer period of time - if you are growing the Alliums - these seeds require a couple weeks to finish, so you'll need to pay attention to keeping them properly moist over a longer period. For Dill - moisture is a different story, but it will also need that long. The other seeds and mixes in this category could just as easily be in the "Perfect Match" category, except the Mother's Mix which is basically a Leafy Sprout, and so belongs here.
Impossible:
Grass and Greens Great for Pre-Sprouting! Full grown Grass or Big Greens just shouldn't be tried - their roots are too big for the Bag's good.
Notes
Hemp Bag Assembly
No assembly required @:-)
Travel Sprouting
The Hemp Bag works well in hotels and on backpacks! Take it with you wherever you go, following the directions on this and the seed information page. Consider travelling with seeds that will sprout easily within your schedule to assure
success.
We took Almonds and San Francisco Mix on a cross-country family road trip - here they are in Cleveland =:-}
Caring for Your Hemp Bag
Cleaning: Between crops: Turn it inside out and remove any seeds or hulls you can. Scrub well with soap and water. Rinse well!
Sterilize: Soap and water is usually all you need, but ou can soak and scrub your bag once every several crops with food grade hydrogen peroxide - or whatever you are comfortable with.
Anything is better for you and the environment than bleach, which is what we used in our day as professional growers. We might even offer something for sterilizing these days. It's always necessary to start with a clean sprouter.
An un-clean sprouter will cause your crop to rot. Our current advice is to use common sense - you know what clean is. You know you need to sterilize your bag if your crops fail after having done well in the past. If all is growing well, just stick with the
basic cleaning.
If you're growing Micro-Greens you should pull as many roots out as you can right after you harvest your crop. If you can get them all then proceed to cleaning.
If there is more root and low stem you can't get out; let the bag dry for a day or 2 or 3. With many Micro-Greens the remaining plant material will virtually disappear as it dries, but what doesn't will be easier to scrub
away when it's totally dry.
Our Hemp Bags are completely without dye!
Some seeds have more pigment than others and will discolor your Hemp Bag. Among the most colorful are Alfalfa, Adzukis, Black Garbanzos, Black Lentils and Clover. You can use bleach occasionally to lighten your Bag if you like - it won't hurt the Bag, but is the color of a bag worth dealing with bleach? Decide for yourself, but do be careful if you use bleach - it is a chemical that is not only bad for the planet, it can burn your skin.
* - Though this page refers specifically to The Sproutpeople's Hemp Sprouting Bag, all Instructions are applicable to any Sprouting Bag.
When I first heard about the benefits of sprouts, I was all-in. my husband wanted awesome nutrition, so I researched and found it. I loved sprouting. I ate the sprouts myself and served them up on sandwiches and my kids tolerated them in my presence, but thier rebellion is another story. My husband, still mentally battling childhood trauma and stuck in a child mentality didn't like the flavor and texture. so I left off of them. I had just ordered a big order too... so my box of seeds, hemp bags, and plans languished in storage for about 5 years.
I am about to test your seeds and see if they survived the storage with any kind of spark.
I have two hemp bags, and a collection of sprouting material. I am excited to start again.
I love everything you all do.
Impressed with the knowledge behind the products. The commitment to such a simple thing, sprouting.
Impressed with the knowledge behind the products. The commitment to such a simple thing, sprouting.
I bought two at first and loved them. They were thicker and had a logo. Then I bought 3 more, but the quality seems lower. The string is thinner, fabric is different and no logo - looks generic. If you bring back the original it would be better.
Sproutpeople Response:
We never had a logo on our bag. We like to keep things simple (not generic though =;-) The fabric is the same organic hemp fabric we've always used.
We've been using our bags for about 20 years and we've yet to break one.
