
small Stainless Steel Sprouter
THE MOST ADORABLE SPROUTER EVER!
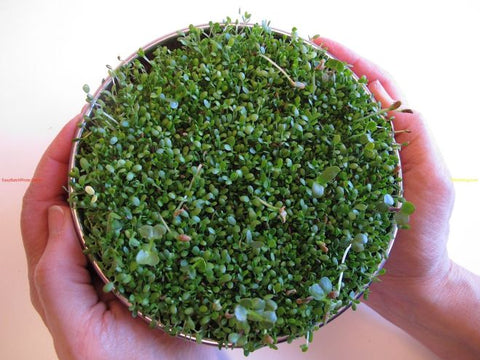
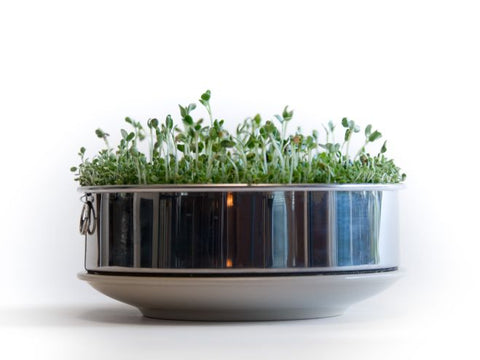
Our small Stainless Steel Sprouter is absolutely awesome! It offers exceptional drainage, and is the best non-plastic small sprouter on our planet. It is ideal for growing vertical Leafy Sprouts and Brassica Sprouts. The small Stainless Steel Sprouter is very versatile - it can sprout virtually any seed. It is even able to grow Grass and Micro-Greens!
Care: We recommend routine maintenance of all stainless steel tools. See details in the tab labeled Notes.
This is a very simple Sprouter. We want to keep this as inexpensive as possible, so you will use two of your own plates - one as a base and one as a cover. Our small Stainless Steel Sprouter is a circular tray - which has a diameter of 6 inches and is 2 inches tall. It is a strong stainless steel circle with a fine mesh (25) stainless steel screen on the bottom. Made in Japan.
We have a bigger SSSprouter too.
small Stainless Steel Sprouter - Growing Instructions
Specific Sprouting Instructions are found on the page devoted to the Seed or Mix you are interested in. Below are sSSSprouter specifics.
Seed Prep
Not all seeds require this step. See the seed information page to see if you need to do this for the seed you are sprouting.
Our sSSSprouter is swell at allowing you to run water through seeds, but getting the seeds out to Soak would be a problem with small seeds, so you'll be happier if you don't prep any but big seeds (beans, grains, greens, etc.) in it.
Soaking
You can not Soak in our sSSSprouter. Use a bowl or similar water holding unit.
Rinsing
Rinse and Drain well every 8-12 hours. Hold sSSSprouter under your faucet or better yet, your sink's sprayer for 15 - 20 seconds - using cool (60 - 70°) water (unless otherwise instructed by your seed supplier - us Sproutpeople, we hope). Move the sprayer or sSSSprouter around to get all of the crop watered well. The rule to remember is: Rinse at least until the water runs clear from the bottom of the tray. You can not over-rinse.
Draining
When you are done Rinsing you need to get as much of the water out of the tray as possible. Tilt, tap, and bounce gently until no more water comes out.
When you are sprouting big seeds it is easy enough to get most of the water out, but when they are small seeds (leafy or brassica sprouts), there will always be some water left, so bounce more than you think is necessary. It can't hurt - unless you knock all your seeds out of the tray.
Sprouting, Greening and De-Hulling
Place your tray on a plate after it has been thoroughly Drained. Place another plate atop the tray. Do be aware that air-circulation is minimal with this set-up - so if you are sprouting in a hot/humid spot; Rinse more often with cool water. You'll stop using the plate on top of the tray if the sprouts grow taller than the trays or need light - which is about the time that lack of air-circulation becomes an issue. Don't feel confused - just pay attention to your sprouts - they'll do great!
If you are growing sprouts with leaves (leafy or brassica sprouts), Grass, Greens, or Micro-Greens; uncover the tray and locate it where they can get some light (according to the directions on that seed's information page) when the seeds have begun to show leaves. Since you are dealing with trays you can get away with more light than when using enclosed sprouters. You can even use direct sunlight, but do pay attention as the sun hastens drying and heats up the sprouts, so you might have to Rinse more often with cool water to compensate. Experiment and see. You'll do fine with minimal light too, so don't feel like you have to push it.
Seed Specific Sprouting Instructions
If you have a particular seed type in mind, read on to discover further details of Tray sprouting that seed type. Refer to the seed's main information page for detailed instructions.
Leafy Sprouts
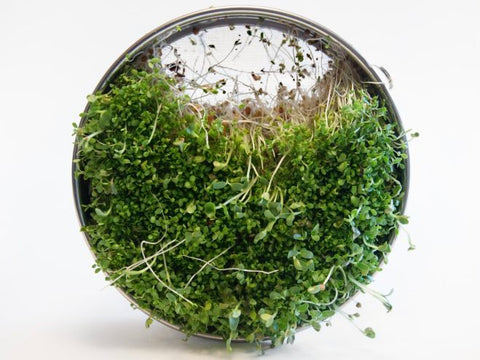
These are the seeds/sprouts that really show off our Stainless Steel Sprouter. You can grow these sprouts Vertically - roots down and leaves up! We did this for years, when we were professional sprout growers (though we used different - larger - trays) and have found ours to be the most beautiful Leafy sprouts we've ever seen. This is the method that achieves the most even greening as almost all of the leaves are exposed to light. That isn't necessary for great Leafy sprouts. Regardless of the growing method you use, the sprouts taste great and are nutritional dynamos!
The method for vertical growing is written on each of the Leafy sprout Growing Instructions pages, but here they are anyway:
The trick to doing this is to keep your sprouts in place (don't "break them up" as you do in a non-tray sprouter) from day 3 onward. It is easy to do, if when Rinsing, you use a sprayer (that attachment most sinks have - the one that pulls out and is gun-like or a faucet attachment that offers spraying when pulled down) instead of your faucet. We have grown many many tons of Leafy sprouts this way. Here is a breakdown of the specifics (Rinse numbers are based on 12 hour intervals - adjust as needed):
Rinse 1 (right after Soak): Use faucet or sprayer and Rinse thoroughly (use water at high pressure and use plenty of it). Keep your seeds in one corner of the tray, when you are done Rinsing. They generate more heat and sprout faster then they would if spread evenly across the bottom of the tray. Rinse 2 and 3: Use faucet or sprayer and Rinse thoroughly. Continue to let the sprouts mass together on one end, or in one corner of the tray. We'll spread them out soon. Rinse 4: Use sprayer and while Rinsing thoroughly, spray your sprouts evenly across the bottom of the tray. You can use your hands to spread them too, but the sprayer is best. The goal is to spread them evenly across the bottom of the tray. Rinse 5 and 6: Use sprayer with less water pressure. Rinse well - (which since you are using less water pressure means - for a longer time - though we're still just talking seconds here - it's not much time with a crop this size.) but don't disturb the sprouts - we want them to stay as even as we can get them, across the tray. Rinse 7 - 12 (you may be done sooner than 12 Rinses - especially if it's summer): Use sprayer. You can turn the water pressure back to high - your sprouts will not be easily moved (their mass broken up) at this point and the higher water pressure feeds oxygen to your sprouts as well as "cleaning" them, which is a wonderful way to produce healthy long lasting sprouts. Rinse and Drain thoroughly. Drain as thoroughly as possible after your last Rinse - you want your sprouts to dry enough to refrigerate in 8-12 hours.
Vertical growing CAN be done without a sprayer too but it is more difficult. If you want to try all you have to do is regulate your water pressure - trying to keep your sprouts undisturbed - especially during rinses 4 - 6.
Greening is done according to the directions on the seed information page.
If you don't wish to grow vertically just follow the standard seed directions on the seed information page.
Maximum dry seed = 1 Tablespoon
Beans
Follow the seed information page instructions for the bean you are growing.
Maximum dry seed = 3/4 Cup
Mung Bean
If you are going for small sweet Mungs you need only follow the directions on the Mung Bean Instruction page. If you are going for big and thick you still need to read those instructions - and the Notes tab on that instruction page, but then read on...
The 2 big issues with growing large, thick rooted Mungs is keeping them dark while growing and applying weight to the growing sprouts.
Though not deep - it is dark inside, so there are possibilities. To apply weight to the growing crop requires something that fits inside of the open top. Since we're talking round here - you may very well have a plate which will fit snugly inside. If you do - you can apply some weight to the plate (i.e. a jar filled with water).
Whenever you try to grow big thick rooted Mung Bean sprouts, you need to keep them from moving: Don't disturb the sprouts - they need to be tightly packed, so after the first Rinse, apply weight directly to the sprouts - anything that will fit snugly inside our sSSSprouter will work. When you Rinse you need to do it gently the first few times. Soon they will be so firmly massed together that you couldn't move them with a fire hose! The only other issue is the soak period we suggest while growing Mungs (around day 3). Since you can't soak in this you 'll need to submerge the tray in a pot (or similar unit) of water. Just be sure that your Mungs are firmly massed before submerging them. If they show any signs of moving when you submerge them - apply weight to the top of them to keep them in place while they soak.
Maximum dry seed = 3/4 cups for small sprouts or 1/3 cup for big sprouts
Brassicas
Broccoli, Radish, Cabbage, Mustard, etc. need to move while sprouting or they will form a root mass (beginning around day 3) which is at least unpleasant, and often lessens the sprouts' quality. Solution: Break Up/Loosen the mass. Use high water pressure at every Rinse to keep the sprouts loose. If they mass together despite your high pressure efforts (which is not uncommon - especially if you are growing the maximum amount of sprouts our sSSSprouter can grow), transfer the sprouts to a big bowl or pot type container. Fill the container with cool water (you can also use high pressure water to fill the container if you want to get a head start on loosening) and reach in with your hands (as long as they are clean) or a fork or the like and gently separate the sprouts. Go ahead and skim any hulls that are floating on top (compost them) and then transfer your Brassica sprouts back to sSSSprouter. You don't have to, but we Rinse again once they are back in their tray. Keep breaking up the mass at every rinse or 2 after that as well.
If you just won't believe that Brassicas can't grow vertically, go ahead and try it - there is no better way to learn - and learning is a good thing (as long as you don't hurt anyone =:-). You should try it with Radish if you must, as it will be the least bad of the Brassicas (it can even produce an edible crop of micro-greens). Just follow the directions above for leafy sprouts. I bet you've never seen blue roots before.....
Maximum dry seed = 2 Tablespoons
Exotics
If you're growing Fenugreek, Mother's Mix or Dill, they require no extra information.
Maximum dry seed = Follow the seed's instruction page. Remember, the 8x10 Tray has a capacity of one quart. A 5x6 Tray is .375 (3/8) quarts.
If you are growing Garlic, Leek and Onion; these all take about 2 weeks to finish sprouting so keep Rinsing and Draining!
Maximum dry seed = 3 Tablespoons
Grains
Follow the instructions on seed's detailed information page for the grain you are growing. There's nothing more you need to know.
Maximum dry seed = 1 1/4 Cup
Nuts, Seeds and Pseudograins
Follow the instructions on seed's detailed information page for the grain you are growing. There's nothing more you need to know.
Maximum dry seed varies depending on what you're growing. Follow the seed's instruction page. Remember, our sSSSprouter has a capacity of one quart.
Grass
Because our sSSSprouter has a top and bottom (your plates) it can hold moisture well, which makes it possible to grow Grass without a medium. Doing so always requires extra attention, but as long as you keep the seeds moist all through growing, it can be done. WE ARE NOT suggesting this as a good way to grow these crops but we are saying that it is possible. Experiment Freely!
The major issues are: Keep rinsing/watering regularly. As the crop grows it needs more and more water (relative to the size of the plant, basically) to keep growing big and tender. Also, the roots will grow out of the holes in the bottom of the tray - in a big way. Be sure to cut them off when you harvest. If you try to pull them you could hurt the fine mesh base. It would be best to use a medium, if you're going this route. You still need to pay attention when you harvest, but a medium usually holds a lot of the roots, so there can be less pressure on the sSSSprouter.
our sSSSprouter is a great Pre-Sprouter - of course!
Maximum dry seed - for Pre-Sprouting = 1 cup. If you want to grow all the way: Determine how much seed to soak by spreading dry seed evenly on the bottom of the tray. If you evenly cover the bottom of the tray with dry seed, you'll have the right amount of soaked seed to grow Grass.
Micro-Greens
I use a medium of 75% Coconut Coir with 25% Earthworm Castings mixed in, to grow upon. If you choose to do this, remember that you need to be careful when you harvest and clean our sSSSprouter, so as to not damage it. It's a strong device, but roots are strong too. Just pay attention to what you're doing. You'll do great.
Maximum seed = 1 Tablespoon
Critter Sprouts
Whether you're growing A Bird Mix or 4 Legs of Love - they require no additional information. Everything you need to know is on the mix' detailed instruction page. You can grow the Bird Mixes into plants if your feathered family likes them that way. You'll find those instructions on our detailed Growing Instructions pages - under the Notes Tab.
Maximum dry seed = 3/4 Cup
Our Stainless Steel Sprouters are the height of simplicity and provides enormous diversity when it comes to the crops you can grow.
You will use a plate to sit under this circular Sprouter, and another to rest atop it at specific times - usually when starting a crop, but depending on what you're sprouting - sometimes for the entire time you are growing a crop. Stainless Steel is expensive stuff so we are keeping your cost down by using your plates instead of manufacturing a top and a base. You're welcome =;-)
Growing Capacity: 1 1/2 Cups (approximately 6 ounces) of Leafy or Brassica Sprouts or 12 ounces of Bean or Grain Sprouts.
Eat More Sprouts + Grow More Often - Easily!
For Detailed Sprouting Instructions, click the name of the Seed or Mix you want to grow.
FOR USE WITH THESE SEEDS/CROPS
Seeds to Sprout in SproutPeople's small Stainless Steel Sprouter
These seeds are a Perfect match for our sSSSprouter:
Leafy Sprouts: Alfalfa, Clover and Mixes - Leafy sprouts are the best thing about using our sSSSSprouter. When you grow these in a tray - they grow vertically, roots down, leaves up! It is very beautiful!
Brassicas - Broccoli, Radish, Mustard, Cabbage, etc. Thanks to this lovely round tray, we can now grow Brassicas vertically, as we do Leafy Sprouts!
Exotics - All
Beans - All (see Mung Note below)
Mung Beans - If you want short, sweet sprouts, our Stainless Steel Tray Sprouter is perfect. It is slightly less perfect for growing large, thick rooted Mungs. The big points here are - keeping them dark while growing, and applying weight to the growing sprouts. Though not deep - it is dark inside, so there are possibilities. To apply weight to the growing crop requires something that fits inside of the open top. Since we're talking round here - you may very well have a plate which will fit snugly inside. If you do - you can apply some weight to the plate (i.e. a jar filled with water). The only other issue is the soak period we suggest while growing Mungs. You can submerge the tray in a pot of water to accomplish that, if you're careful. Read the notes further down the page.
Grains - All
Nuts and Seeds - Almonds, Buckwheat Groats, Market Mix, Peanuts, Sunflower, and even tiny seeds like Amaranth.
Grass - We love our small Stainless Steel Sprouter for Grass! We can grow all the way without any Medium - though we prefer to use Coconut Coir Growing Medium. One point to remember is that after you cut your Grass - or your cat is done with it - cut the roots that grew out of the bottom before 'pulling' it out. And, do take it easy - it is a fine mesh screen and you don't want to hurt this sweet sprouter.
Micro-Greens are also great in our small Stainless Steel Tray Sprouter. They require a medium - and our perfect choice is Coconut Coir - but, do be sure to wash well if you also grow Sprouts in the same sSSSprouter. You don't want Coconut Coir fibers in your crops =;-)
Stainless Steel Sprouter - Growing Instructions
Specific Sprouting Instructions are found on the page devoted to the Seed or Mix you are interested in. Below are sSSSprouter specifics.
Seed Prep
Not all seeds require this step. See the seed information page to see if you need to do this for the seed you are sprouting.
Our sSSSprouter is swell at allowing you to run water through seeds, but getting the seeds out to Soak would be a problem with small seeds, so you'll be happier if you don't prep any but big seeds (beans, grains, greens, etc.) in it.
Soaking
You can not Soak in our sSSSprouter. Use a bowl or similar water holding unit.
Rinsing
Rinse and Drain well every 8-12 hours. Hold sSSSprouter under your faucet or better yet, your sink's sprayer for 15 - 20 seconds - using cool (60 - 70°) water (unless otherwise instructed by your seed supplier - us Sproutpeople, we hope). Move the sprayer or sSSSprouter around to get all of the crop watered well. The rule to remember is: Rinse at least until the water runs clear from the bottom of the tray. You can not over-rinse.
Draining
When you are done Rinsing you need to get as much of the water out of the tray as possible. Tilt, tap, and bounce gently until no more water comes out.
When you are sprouting big seeds it is easy enough to get most of the water out, but when they are small seeds (leafy or brassica sprouts), there will always be some water left, so bounce more than you think is necessary. It can't hurt - unless you knock all your seeds out of the tray.
Sprouting, Greening and De-Hulling
Place your tray on a plate after it has been thoroughly Drained. Place another plate atop the tray. Do be aware that air-circulation is minimal with this set-up - so if you are sprouting in a hot/humid spot; Rinse more often with cool water. You'll stop using the plate on top of the tray if the sprouts grow taller than the trays or need light - which is about the time that lack of air-circulation becomes an issue. Don't feel confused - just pay attention to your sprouts - they'll do great!
If you are growing sprouts with leaves (leafy or brassica sprouts), Grass, Greens, or Micro-Greens; uncover the tray and locate it where they can get some light (according to the directions on that seed's information page) when the seeds have begun to show leaves. Since you are dealing with trays you can get away with more light than when using enclosed sprouters. You can even use direct sunlight, but do pay attention as the sun hastens drying and heats up the sprouts, so you might have to Rinse more often with cool water to compensate. Experiment and see. You'll do fine with minimal light too, so don't feel like you have to push it.
Seed Specific Sprouting Instructions
If you have a particular seed type in mind, read on to discover further details of Tray sprouting that seed type. Refer to the seed's main information page for detailed instructions.
Leafy Sprouts
These are the seeds/sprouts that really show off our Stainless Steel Sprouter. You can grow these sprouts Vertically - roots down and leaves up! We did this for years, when we were professional sprout growers (though we used different - larger - trays) and have found ours to be the most beautiful Leafy sprouts we've ever seen. This is the method that achieves the most even greening as almost all of the leaves are exposed to light. That isn't necessary for great Leafy sprouts. Regardless of the growing method you use, the sprouts taste great and are nutritional dynamos!
The method for vertical growing is written on each of the Leafy sprout Growing Instructions pages, but here they are anyway:
The trick to doing this is to keep your sprouts in place (don't "break them up" as you do in a non-tray sprouter) from day 3 onward. It is easy to do, if when Rinsing, you use a sprayer (that attachment most sinks have - the one that pulls out and is gun-like or a faucet attachment that offers spraying when pulled down) instead of your faucet. We have grown many many tons of Leafy sprouts this way. Here is a breakdown of the specifics (Rinse numbers are based on 12 hour intervals - adjust as needed):
Rinse 1 (right after Soak): Use faucet or sprayer and Rinse thoroughly (use water at high pressure and use plenty of it). Keep your seeds in one corner of the tray, when you are done Rinsing. They generate more heat and sprout faster then they would if spread evenly across the bottom of the tray. Rinse 2 and 3: Use faucet or sprayer and Rinse thoroughly. Continue to let the sprouts mass together on one end, or in one corner of the tray. We'll spread them out soon. Rinse 4: Use sprayer and while Rinsing thoroughly, spray your sprouts evenly across the bottom of the tray. You can use your hands to spread them too, but the sprayer is best. The goal is to spread them evenly across the bottom of the tray. Rinse 5 and 6: Use sprayer with less water pressure. Rinse well - (which since you are using less water pressure means - for a longer time - though we're still just talking seconds here - it's not much time with a crop this size.) but don't disturb the sprouts - we want them to stay as even as we can get them, across the tray. Rinse 7 - 12 (you may be done sooner than 12 Rinses - especially if it's summer): Use sprayer. You can turn the water pressure back to high - your sprouts will not be easily moved (their mass broken up) at this point and the higher water pressure feeds oxygen to your sprouts as well as "cleaning" them, which is a wonderful way to produce healthy long lasting sprouts. Rinse and Drain thoroughly. Drain as thoroughly as possible after your last Rinse - you want your sprouts to dry enough to refrigerate in 8-12 hours.
Vertical growing CAN be done without a sprayer too but it is more difficult. If you want to try all you have to do is regulate your water pressure - trying to keep your sprouts undisturbed - especially during rinses 4 - 6.
Greening is done according to the directions on the seed information page.
If you don't wish to grow vertically just follow the standard seed directions on the seed information page.
Maximum dry seed = 1 Tablespoon
Beans
Follow the seed information page instructions for the bean you are growing.
Maximum dry seed = 3/4 Cup
Mung Bean
If you are going for small sweet Mungs you need only follow the directions on the Mung Bean Instruction page. If you are going for big and thick you still need to read those instructions - and the Notes tab on that instruction page, but then read on...
The 2 big issues with growing large, thick rooted Mungs is keeping them dark while growing and applying weight to the growing sprouts.
Though not deep - it is dark inside, so there are possibilities. To apply weight to the growing crop requires something that fits inside of the open top. Since we're talking round here - you may very well have a plate which will fit snugly inside. If you do - you can apply some weight to the plate (i.e. a jar filled with water).
Whenever you try to grow big thick rooted Mung Bean sprouts, you need to keep them from moving: Don't disturb the sprouts - they need to be tightly packed, so after the first Rinse, apply weight directly to the sprouts - anything that will fit snugly inside our sSSSprouter will work. When you Rinse you need to do it gently the first few times. Soon they will be so firmly massed together that you couldn't move them with a fire hose! The only other issue is the soak period we suggest while growing Mungs (around day 3). Since you can't soak in this you 'll need to submerge the tray in a pot (or similar unit) of water. Just be sure that your Mungs are firmly massed before submerging them. If they show any signs of moving when you submerge them - apply weight to the top of them to keep them in place while they soak.
Maximum dry seed = 3/4 cups for small sprouts or 1/3 cup for big sprouts
Brassicas
Broccoli, Radish, Cabbage, Mustard, etc. need to move while sprouting or they will form a root mass (beginning around day 3) which is at least unpleasant, and often lessens the sprouts' quality. Solution: Break Up/Loosen the mass. Use high water pressure at every Rinse to keep the sprouts loose. If they mass together despite your high pressure efforts (which is not uncommon - especially if you are growing the maximum amount of sprouts our sSSSprouter can grow), transfer the sprouts to a big bowl or pot type container. Fill the container with cool water (you can also use high pressure water to fill the container if you want to get a head start on loosening) and reach in with your hands (as long as they are clean) or a fork or the like and gently separate the sprouts. Go ahead and skim any hulls that are floating on top (compost them) and then transfer your Brassica sprouts back to sSSSprouter. You don't have to, but we Rinse again once they are back in their tray. Keep breaking up the mass at every rinse or 2 after that as well.
If you just won't believe that Brassicas can't grow vertically, go ahead and try it - there is no better way to learn - and learning is a good thing (as long as you don't hurt anyone =:-). You should try it with Radish if you must, as it will be the least bad of the Brassicas (it can even produce an edible crop of micro-greens). Just follow the directions above for leafy sprouts. I bet you've never seen blue roots before.....
Maximum dry seed = 2 Tablespoons
Exotics
If you're growing Fenugreek, Mother's Mix or Dill, they require no extra information.
Maximum dry seed = Follow the seed's instruction page. The capacity is 3 pints - so 75% of a Quart.
If you are growing Garlic, Leek and Onion; these all take about 2 weeks to finish sprouting so keep Rinsing and Draining!
Maximum dry seed = 3 Tablespoons
Grains
Follow the instructions on seed's detailed information page for the grain you are growing. There's nothing more you need to know.
Maximum dry seed = 1 1/4 Cup
Nuts, Seeds and Pseudograins
Follow the instructions on seed's detailed information page for the grain you are growing. There's nothing more you need to know.
Maximum dry seed varies depending on what you're growing. Follow the seed's instruction page. Remember, our sSSSprouter has a capacity of one quart.
Grass
Because our sSSSprouter has a top and bottom (your plates) it can hold moisture well, which makes it possible to grow Grass without a medium. Doing so always requires extra attention, but as long as you keep the seeds moist all through growing, it can be done. WE ARE NOT suggesting this as a good way to grow these crops but we are saying that it is possible. Experiment Freely!
The major issues are: Keep rinsing/watering regularly. As the crop grows it needs more and more water (relative to the size of the plant, basically) to keep growing big and tender. Also, the roots will grow out of the holes in the bottom of the tray - in a big way. Be sure to cut them off when you harvest. If you try to pull them you could hurt the fine mesh base. It would be best to use a medium, if you're going this route. You still need to pay attention when you harvest, but a medium usually holds a lot of the roots, so there can be less pressure on the sSSSprouter.
our sSSSprouter is a great Pre-Sprouter - of course!
Maximum dry seed - for Pre-Sprouting = 1 cup. If you want to grow all the way: Determine how much seed to soak by spreading dry seed evenly on the bottom of the tray. If you evenly cover the bottom of the tray with dry seed, you'll have the right amount of soaked seed to grow Grass.
Micro-Greens
Maximum seed = 1 Tablespoon
I use a medium of 75% Coconut Coir with 25% Earthworm Castings mixed in, to grow upon. If you choose to do this, remember that you need to be careful when you harvest and clean our sSSSprouter, so as to not damage it. It's a strong device, but roots are strong too. Just pay attention to what you're doing. You'll do great.
Critter Sprouts
Whether you're growing A Bird Mix or 4 Legs of Love - they require no additional information. Everything you need to know is on the mix' detailed instruction page. You can grow the Bird Mixes into plants if your feathered family likes them that way. You'll find those instructions on our detailed Growing Instructions pages - under the Notes Tab.
Maximum dry seed = 3/4 Cup
Notes
Cleaning: Wash well between crops with soap and water. Rinse well. Our small Stainless Steel Sprouter is also dishwasher safe. And to keep your sprouter sparkling, we recommend soaking it in vinegar, a citric acid solution, or any cleaner specially made for stainless steel. Do consider a cleaner such as vinegar, citric acid or a commercial solution that will regularly maintain all your stainless steel. White Vinegar is good for making your sprouter shine. Just soak for 15 mintues. If using citric acid: Soak 15 to 30 minuties in a 1-to-8 citric acid-to-water solution. If any "tea-stains" begin to develop, use citric acid in a 1-to-2 citric acid-to-water solution. Soak for up to several hours. Rub with toothbrush or soft cloth. There are also some stronger commercial soultions on the market made just for stainless steel. We sell CitriSurf 77 for general maintenance of your stainless steel as a rust-inhibitor.
Though it is very (VERY!) rare to develop rust on our Stainless Steel Sprouters or Screen Lids - it is possible. We want to share facts and fixes with you. Stainless steel can sometimes show some “tea staining” (a stainless steel industry term for rust) even when just a tiny amount of free iron is attached to the welded areas of a stainless appliance. If any sign of staining on a stainless appliance will send you through the roof, please do not purchase our stainless steel trays on the off-chance that you may see some staining at some point. Stick to plastic trays instead. While staining is rare in stainless, it can happen, due to things such as the make up of your water, a bit of free iron, salt, etc. FYI - I've been using 5 of our SSSprouters for years now and I've yet to see any rust.
The good news is — there are are several ways to treat stains, incase any of your stainless appliances, not just your sprouting tray, begin to show discoloration...
1. CitriSurf 77 - This is not a chemical concoction. It's made with citrus. Use this formula to “prep”. It draws any “free iron” out of your stainless appliances that may have been left after manufacture. Apply for 30 minutes, then rinse in warm water. We sell it in a spray bottle but it is best on the SSSprouter to pour some CitriSurf 77 out onto a large plate and let the sprouter “soak” in it around the bottom. The CitriSurf can be very shallow - a quarter cup should do it. Spray some on the wall seam of the sprouter as well. Let the whole thing sit 30 minutes, then rinse with warm water.
2. Citric acid works pretty well if you don’t have CitriSurf. Citric acid powder is readily available — just mix a tablespoon in a quart of water and soak your sprouter for 30 minutes, just like in CitriSurf, then rinse in warm water.
3. Bar Keeper’s Friend - a wonderful non-abrasive cleaner with acids and feldspar that works wonders on any stainless steel! Should be easy to find. Here are directions from a dear customer (We Love You Diane!) who discovered this wonderful use for it:
a. Use a moist (not dripping) toothbrush dipped in Bar Keepers Friend and deposit the resulting 'paste' on the spots.
b. Let it sit for 20 minutes, LIGHTLY SCRUB the area with the toothbrush and *Voila!* - virtually all of the spotting is removed!
Sterilize: Soap and water usually do the trick, but you can use something stronger every several crops. We suggest food grade hydrogen peroxide or Grapefruit Seed Extract - or anything else you are comfortable with. There are many options these days. Whatever you go with, do remember: It is always true, that a sterile sprouter is a great place to begin a crop.
small Stainless Steel Tray Sprouter Assembly
Your big decision is which plates to use to sit under and atop your Stainless Steel Tray. Your other decision is whether to stack or not. If you have more than one - and wish to stack trays - use more plates =:-)
Really the only and best way to sprout! I aspire to three in all (now have two).
I got small SS sprouter a couple of weeks ago. I was inspired by Gil growing leafy greens upright. So far I have grown 2 crops of the Russian mix. I love this mix because it seems to grow very fast. I was so impressed by the length I got on these sprouts. I had been growing them in the Easy Sprouter and that had worked out well. I find I get more length and just as much (or maybe more) than I got in the Easy sprouter? It's very rewarding to see them growing out in the open sprouter.
I got small SS sprouter a couple of weeks ago. I was inspired by Gil growing leafy greens upright. So far I have grown 2 crops of the Russian mix. I love this mix because it seems to grow very fast. I was so impressed by the length I got on these sprouts. I had been growing them in the Easy Sprouter and that had worked out well. I find I get more length and just as much (or maybe more) than I got in the Easy sprouter? It's very rewarding to see them growing out in the open sprouter.
I've used the basic seed sprouter for years. I liked having sprouts, but didn't enjoy wasting so many sprouts trying to get the hulls off once they were ready. The steel sprouter is awesome! It is so easy to rinse the seeds/baby sprouts, and then harvest them! We enjoyed watching the sprouts get taller, which is something that wasn't really noticeable in the basic sprouter! Even though I haven't eaten my last batch of sprouts yet, I want to start another because it is so much fun using the vertical sprouter!
I've used the basic seed sprouter for years. I liked having sprouts, but didn't enjoy wasting so many sprouts trying to get the hulls off once they were ready. The steel sprouter is awesome! It is so easy to rinse the seeds/baby sprouts, and then harvest them! We enjoyed watching the sprouts get taller, which is something that wasn't really noticeable in the basic sprouter! Even though I haven't eaten my last batch of sprouts yet, I want to start another because it is so much fun using the vertical sprouter!
